
DIY Headlight Restoration: The Complete Guide (2026)
Cloudy, yellow, or foggy headlights are one of the most common problems on cars over three or four years old — and one of the most misunderstood. Many drivers assume the only options are an expensive detailer visit or a costly headlight replacement. Neither is usually necessary.
DIY headlight restoration is a well-established, effective process that most drivers can complete at home in about two minutes per headlight, using the same fundamental chemistry professional detailers rely on. This guide brings together everything you need to know in one place: why headlights oxidize, what genuinely works versus what doesn't, the complete step-by-step process, realistic costs and timelines, and the mistakes that cause most DIY attempts to underperform.
Whether you're dealing with a slight haze or headlights that have been neglected for a decade, this guide covers it.
WHAT THIS GUIDE COVERS
1. Why headlights turn yellow and cloudy
2. Does DIY restoration actually work?
3. Restoration methods compared
4. The complete 3-step process
5. Realistic costs
6. How long results last
7. Common mistakes to avoid
8. When restoration isn't the answer

1. Why Headlights Turn Yellow and Cloudy
Modern headlight lenses are made from polycarbonate plastic rather than glass — lighter, more impact-resistant, but vulnerable to UV radiation. Every lens ships with a thin protective hardcoat that blocks UV rays. Over several years of sun exposure, that hardcoat degrades, and once it's gone, the polycarbonate underneath begins to oxidize — turning yellow, hazy, then cloudy as the process continues.
This is a chemical change to the lens surface itself, not surface dirt, which is why washing has no effect on it. The oxidized layer sits entirely on the surface, though, which is exactly why it can be removed and the lens resealed — no replacement necessary in most cases.
For the complete science behind this process, see our dedicated guide: Why Headlights Turn Yellow.
2. Does DIY Headlight Restoration Actually Work?
Yes — when the process includes all three necessary stages: removing the oxidized layer, preparing the surface, and sealing it with UV protection. Products or methods that skip any of these steps produce results that fade quickly, which is the source of most scepticism about DIY restoration.
Done completely, DIY restoration produces results that are functionally and visually equivalent to professional detailing, because the underlying chemistry is identical — the difference is simply who applies it.
DIY headlight restoration works exactly as well as professional restoration, because it's the same three-stage chemical process. The only real question is whether the specific product or method you use includes all three stages.
For real customer experiences and an honest breakdown of what to expect, see Do Headlight Restoration Kits Really Work?.
"Was skeptical this would actually do anything meaningful — figured it was one of those products that looks good in the ad and does nothing in real life. Genuinely surprised. Both headlights, five minutes, real results. Wish I'd tried it a year ago instead of just living with foggy headlights."
— Marcus T. 2014 Toyota Camry
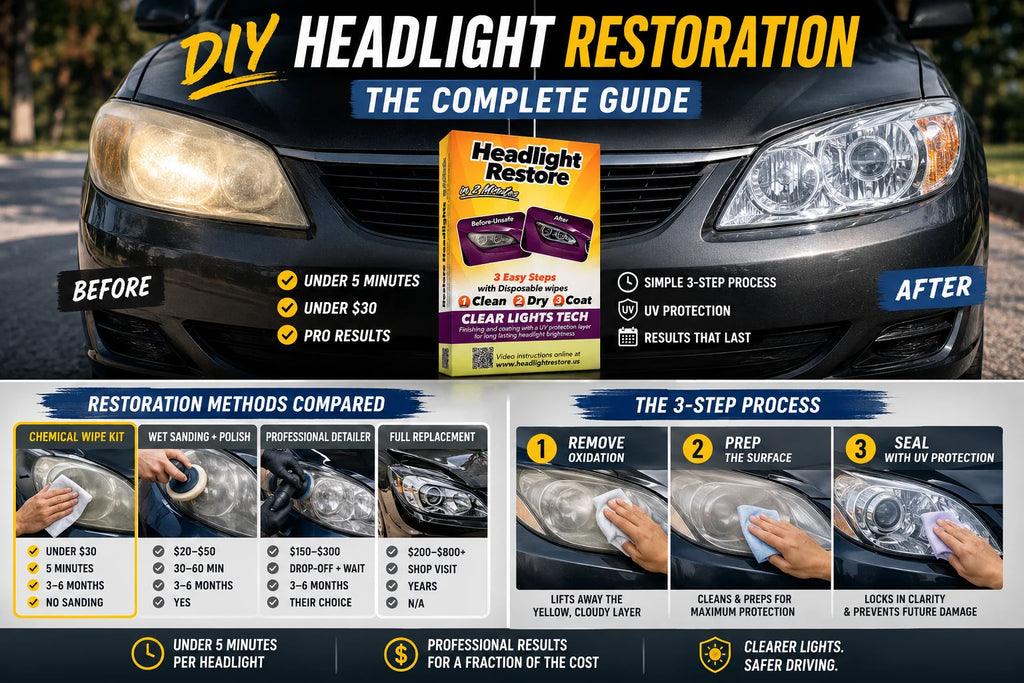
3. Restoration Methods Compared
There are several approaches to headlight restoration. Here's how they stack up:
| Method | Cost | Time | Lasts | Sanding? |
| DIY chemical wipe kit ★ | Under $30 | 2 min per headlight | 3–6 months | No |
| Professional detailer | $150–$300 | Drop-off + wait | 3–6 months | Their choice |
| Wet sanding + polish | $20–$50 | 30–60 min | 3–6 months | Yes |
| Full replacement | $200–$800+ | Shop visit | Years | N/A |
★ For most drivers with light to moderate oxidation, a DIY chemical wipe kit produces professional-quality results at a fraction of the cost, time, and risk.

For a deeper comparison of chemical versus sanding methods specifically, see How to Restore Headlights Without Sanding.
4. The Complete 3-Step Process
This is the core process behind every effective headlight restoration, DIY or professional. Total time: about two minutes per headlight.
Step 1 Remove the Oxidation
Apply the oxidation-removal compound with firm circular pressure across the full lens. You'll see yellow or cloudy residue transferring onto the cloth as the degraded layer lifts away. Continue until the cloth runs clean. For heavier oxidation, a second pass on the worst areas before moving on is more effective than rushing ahead.
Pro tip: This step alone often makes the lens look dramatically better — but don't stop here. The result won't last without the next two steps.
Step 2 Prep the Surface
Remove compound residue and leave the polycarbonate clean and ready to bond with the UV sealant. Cover the full lens including corners and edges — any missed spot weakens the protection there specifically.
Pro tip: This is the step most home remedies skip entirely, which is exactly why they don't last.
Step 3 Seal with UV Protection
Apply a UV-blocking sealant across the full lens in slow, overlapping strokes. This replaces the factory hardcoat that degraded over time and is what determines how long the result lasts. Allow a few minutes to cure before water or direct sun exposure.
Pro tip: This is the single most important step for longevity. Skip it, and any restoration — chemical or sanded — fades within weeks.
For the most detailed technical walkthrough of this process, see The 3-Wipe Headlight Restoration Method Explained.
5. Realistic Costs
A complete DIY kit typically costs under $30 and covers both headlights for one complete three-step treatment. Compare that to professional detailing at $150 to $300, or full headlight assembly replacement at $200 to $800+ per side — DIY restoration is dramatically more cost-effective for the vast majority of cases, which involve surface oxidation rather than structural damage.
For the complete cost analysis, see Headlight Restoration Cost — DIY vs Professional vs Replacement.
6. How Long Do Results Last?
With the UV sealant correctly applied, results typically last three to six months under normal driving conditions. Vehicles parked outdoors in sunny climates will need a repeat treatment sooner than garaged vehicles. When the lens starts to dull, repeat the full three-step process — there is no sealant-only shortcut, because the UV coat needs a freshly cleaned and prepared surface to bond to. Caught early, wipe one has very little to remove and the job takes about two minutes per headlight.
For the complete picture on durability and maintenance, see How Long Does Headlight Restoration Last?.
7. Common Mistakes to Avoid
- Stopping after the first wipe — the surface looks better but is completely unprotected
- Skipping the surface prep step, which prevents the UV sealant from bonding properly
- Using toothpaste or other home remedies without UV protection — they fade within weeks
- Working in direct sunlight, which causes the compound to dry too fast
- Using too little pressure on the oxidation-removal step
- Applying the UV coat unevenly, leaving some areas under-protected
For the complete breakdown of each mistake and how to avoid it, see Why DIY Headlight Restoration Fails.
8. When Restoration Isn't the Answer
Restoration works for surface oxidation, which covers the vast majority of cloudy or yellow headlights. It does not fix physically cracked lenses or internal fogging caused by a failed housing seal — those require replacement. If your lens surface feels rough but is intact, restoration will work. If moisture is visible inside the housing or the lens is cracked, replacement is necessary.
For a complete framework to decide between restoration and replacement, see Headlight Restoration vs Replacement.
|


Explore the Full Headlight Restoration Library
This guide covers the essentials — for deeper detail on any specific topic, explore the full library below:
Understanding the Problem
→ Why Headlights Turn Yellow — The Science Behind UV Oxidation
→ 7 Signs Your Headlights Need Restoration
→ Severe Headlight Oxidation — How to Fix Even the Worst Cases
The Restoration Process
→ The 3-Wipe Headlight Restoration Method Explained
→ How to Restore Oxidized Headlights at Home
→ How to Restore Yellow Headlights at Home
→ How to Restore Headlights Without Sanding
→ How to Clean Foggy Headlights — What Actually Works
Results, Cost & Comparisons
→ Headlight Restoration Before and After
→ Headlight Restoration Cost — DIY vs Professional vs Replacement
→ How Long Does Headlight Restoration Last?
→ How Many Times Can You Restore Headlights Before Replacing Them?
→ Headlight Restoration vs Replacement
→ Do Headlight Restoration Kits Really Work?
Avoiding Mistakes & Choosing Products
→ Why DIY Headlight Restoration Fails
→ Does Toothpaste Really Restore Headlights?
→ Best Headlight Restoration Kit — What to Look For
→ Headlight Cleaner vs Restoration Kit
Prevention & Safety
→ How to Protect Headlights from UV Damage
→ How to Improve Night Driving Visibility
Frequently Asked Questions
Is DIY headlight restoration actually as good as professional restoration?
Yes, when the process includes all three stages: oxidation removal, surface preparation, and UV sealing. Professional detailers use the same fundamental chemistry — the results are functionally identical when both are done completely.
How long does DIY headlight restoration take?
About two minutes per headlight using a complete three-step wipe kit, plus a few minutes of cure time for the UV sealant.
How much does DIY headlight restoration cost?
A complete kit typically costs under $30 and covers both headlights for one complete three-step treatment. This compares to $150–$300 for professional detailing or $200–$800+ per side for replacement.
Do I need to sand my headlights for DIY restoration?
No, not for the vast majority of cases. A chemical wipe kit removes oxidation without any abrasion, working effectively on light to severe oxidation. Sanding is only genuinely necessary for deeply pitted lenses that chemical removal alone can't fully address.
Why does DIY headlight restoration sometimes fail?
The most common reason is skipping the UV sealant step, which leaves the cleaned polycarbonate unprotected and causes rapid re-oxidation. Other common mistakes include incomplete oxidation removal or uneven UV coat application.
Can DIY restoration fix headlights that have been neglected for years?
In most cases, yes. Severe oxidation from years of neglect typically requires two applications of the oxidation-removal step rather than one, but the same process still works effectively. Only physically cracked lenses or internal seal failures require replacement instead.
The Bottom Line
DIY headlight restoration is a genuinely effective, well-understood process — not a shortcut or a compromise compared to professional service. When done completely, using a kit that includes oxidation removal, surface preparation, and UV sealing, the results match professional detailing at a fraction of the cost and time.
Whether your headlights have a slight haze or years of neglected yellowing, the same three-step process applies. Understand the process, avoid the common mistakes, and set realistic expectations for your specific level of oxidation, and the results speak for themselves.
The headlight cleaning and restoration wipes include everything covered in this guide in one kit. Browse the full restoration collection or check the FAQ page for anything not covered here.
Start your DIY restoration today.
Everything you need, in one two-minute kit.