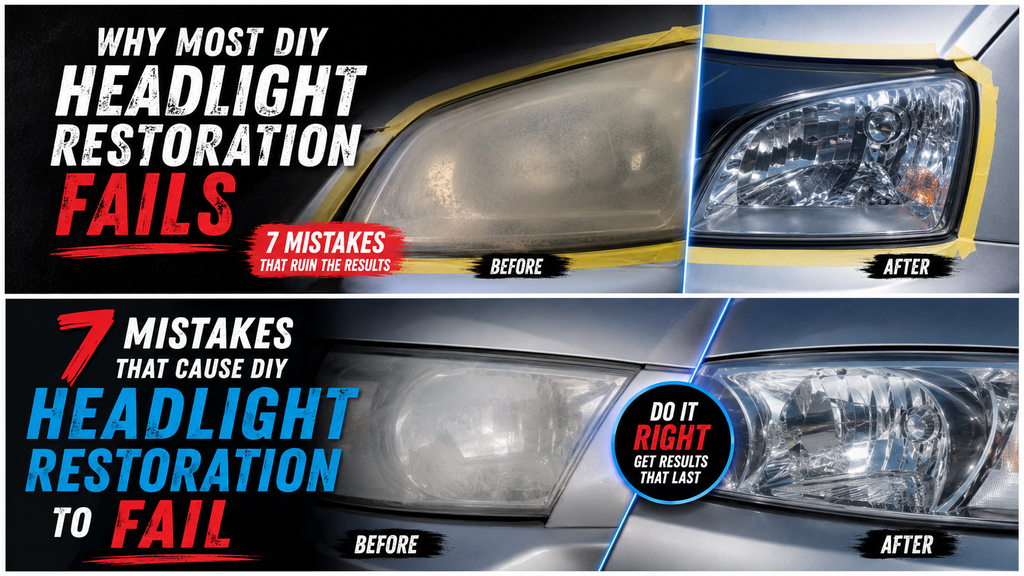
Why DIY Headlight Restoration Fails — 7 Mistakes and How to Fix Them
Here's a situation that happens more often than it should: someone spends an afternoon restoring their headlights, steps back and thinks it looks great — and then a few weeks later the cloudiness is back and it looks exactly the same as before.
If that sounds familiar, the frustrating part is that it wasn't bad luck. There's a specific reason it happened, and in almost every case it comes down to one of the same handful of mistakes.
DIY headlight restoration works. The chemistry is real, the results are achievable, and the difference it makes to night visibility is significant. But the process has to be done correctly — all the way through — or the improvement you see on day one will quietly disappear over the following weeks.
Here are the seven most common reasons DIY headlight restoration fails, what's actually going wrong in each case, and how to make sure it doesn't happen to you.
 |
Why Headlight Restoration Fails More Often Than It Should
The core issue is that most people treat headlight restoration as a single step — clean it, done. In reality, it's a three-part process where each stage depends on the one before it. Missing or rushing any part of that process creates a gap that causes the result to fall apart.
The other problem is that the short-term result of a failed restoration often looks identical to a successful one. Both look clearer immediately after treatment. The difference only becomes obvious weeks later when one stays clear and the other goes foggy again.
Understanding why it fails is actually the most useful thing you can learn before attempting it — because once you know what causes the failure, avoiding it is straightforward.
Before diving into the mistakes, it helps to understand the underlying problem. Our guide on how oxidized headlights form and why they cloud over explains what you're actually treating — and why the process needs to go all the way to UV protection to hold.
The 7 Mistakes That Cause DIY Headlight Restoration to Fail
|
MISTAKE #1 Stopping After the First Step This is the single most common reason headlight restoration fails — and it happens because the first step produces such a visible improvement that it feels like the job is done. You wipe off the oxidation, the lens looks dramatically clearer, and you call it finished. But the first step only removes the degraded surface layer. The polycarbonate underneath is now raw, clean, and completely exposed to the same UV radiation that caused the problem. Without a protective coat applied immediately after, re-oxidation starts from day one. Within two to four weeks the cloudiness returns — sometimes faster in hot or sunny climates. The fix: Always complete all three steps in order without skipping the final UV sealant coat. The first step cleans. The third step protects. Both are required for lasting results. |
|
MISTAKE #2 Skipping the Surface Prep Step Between removing the oxidation and applying the UV sealant, there is a critical preparation step that most people either skip or rush. This step removes compound residue and surface contaminants, leaving the polycarbonate chemically neutral and ready to bond with the protective coat. If the surface isn't properly prepped, the UV sealant sits on a layer of residue rather than bonding directly to the lens. The result looks fine initially but peels or wears off in days rather than holding for months. It's a five-second step that most failed restorations never include. The fix: Apply the prep wipe thoroughly across the full lens surface before moving to the UV coat. Do not rush this step or skip it to save time. |
|
MISTAKE #3 Using Toothpaste, Baking Soda, or Other Home Remedies Toothpaste and baking soda are mild abrasives — they remove some surface oxidation through friction, and the lens does look clearer immediately after. The problem is twofold: they contain no UV protection, and repeated abrasion gradually removes polycarbonate material from the lens surface itself. The result is a lens that re-oxidizes within weeks, is now slightly thinner than before, and is more porous and vulnerable to future damage. Every time the 'hack' is repeated, the lens degrades a little more. Many drivers who've used toothpaste repeatedly for years end up with lenses that are genuinely harder to restore properly because the surface has been so frequently abraded. The fix: Use a purpose-built restoration compound with a UV-protective final step. If you've previously used toothpaste on the lens, clean the surface thoroughly before applying the compound to ensure proper bonding. |
We covered this in detail in our previous article: Does Toothpaste Really Restore Headlights? The Honest Answer — including why the short-term clarity disappears and what the science says about repeated abrasion.
|
MISTAKE #4 Working in Direct Sunlight Temperature and sunlight affect how restoration compounds behave on the surface. When you apply the oxidation removal compound in direct sunlight on a hot lens, it can dry and harden before it has fully dissolved and lifted the oxidized layer. You end up with a patchy result that leaves some oxidation behind — particularly in the corners and edges of the lens where the compound dries fastest. The UV sealant also bonds better to a surface that hasn't been heat-stressed during application. The fix: Work in shade, indoors, or early morning before the sun gets hot. If you're working outside in warm weather, work on one section at a time and keep the lens surface damp with the compound throughout the process. |
|
MISTAKE #5 Using Too Little Pressure on the First Wipe The oxidation removal step requires actual friction to be effective — the compound needs to be worked into the surface with firm, circular pressure to fully break up and lift the degraded layer. Many people apply it with the same light touch they'd use to polish a glass screen, which leaves oxidation embedded in the micro-pores of the polycarbonate surface. The lens looks cleaner but the oxidation hasn't fully been removed. When the UV coat goes over an incompletely cleaned surface, it seals in the remaining haze rather than over a clear lens — and the result looks dull or patchy rather than optically clear. The fix: Apply firm, consistent circular pressure throughout the full surface. Keep working until the cloth comes away clean with no more yellow or grey residue transferring from the lens. |
|
MISTAKE #6 Applying the UV Coat Unevenly or Too Thinly The UV protective sealant needs to cover the entire lens surface uniformly to provide consistent protection. Rushed or uneven application leaves areas of the lens with thinner or no coverage — and those areas re-oxidize faster than the rest. You end up with a headlight that looks good in the centre but starts turning hazy at the edges, or that develops patchy discolouration within a few weeks. This mistake is especially common when people rush the final step after spending time on the first two. The fix: Apply the UV coat in slow, overlapping strokes that cover the full lens including the outer edges. Allow adequate cure time — typically a few minutes — before exposing the lens to water, sunlight, or anything that could disturb the coat while it sets. |
|
MISTAKE #7 Not Cleaning the Lens Before Starting Starting the restoration process on a dirty lens is a surprisingly common mistake — especially when the headlights look so cloudy that the surface condition doesn't seem to matter much. But dirt, road grime, insect residue, and surface contamination interfere with the oxidation removal compound in step one, reducing its contact with the actual oxidized layer. The compound ends up working through a layer of contamination rather than directly on the polycarbonate surface. The result is uneven oxidation removal that leaves behind patches the compound never fully reached. The fix: Wash the headlight lens with clean water and allow it to dry completely before starting the restoration process. A clean, dry surface is the correct starting point for every step. |
|
Every single one of these mistakes is avoidable. The restoration process itself is not complicated — but it has to be done completely, in the right conditions, and in the right order. |
 |
What a Successful Restoration Looks Like — Step by Step
For context, here is what the correct process looks like when all the common mistakes are avoided. This is the same method professional detailers use, done at home in under five minutes:
- Wash the headlight lens with clean water and allow it to dry fully.
- Apply the oxidation removal compound with firm, circular pressure. Work across the full surface until the cloth comes away clean.
- Apply the surface prep wipe across the entire lens to remove compound residue and prepare the polycarbonate for bonding.
- Apply the UV protective sealant in slow, overlapping strokes. Cover the full lens including edges and corners. Allow to cure for a few minutes.
- Do not expose the treated lens to water or direct sunlight during the curing period.
That is the complete process. Five steps. Under five minutes. The difference between a restoration that lasts several months and one that lasts two weeks comes down entirely to following all five of those steps correctly.
For a detailed walkthrough of each step with explanations of what is happening at a chemical level, read our full guide: The 3-Wipe Headlight Restoration Method Explained.
You can also find our step-by-step application guide with visuals on the product page.
How to Tell If Your Previous Restoration Was Done Correctly
If you've already restored your headlights and you're not sure whether the UV protection was applied properly, there is a simple way to check.
Run a clean finger across the lens surface two to three weeks after the restoration. A correctly sealed lens should still feel smooth and look optically clear. If the surface already feels slightly rough or hazy in patches, the UV coat either wasn't applied or didn't bond — meaning re-oxidation has already started.
If that's the case, the good news is you don't need to wait for full failure before retreating. You can repeat the full three-step process, or in some cases just reapply the UV sealant if the oxidation removal was thorough and the only issue was the protective coat.
Curious what a correctly restored lens looks like compared to an untreated one? See the side-by-side test where one headlight was restored and one left untreated — the visual difference after a few weeks is exactly what you're looking for.
|
Ready to do it right this time? The 3-wipe kit includes everything — no steps missing, no guesswork. |

Quick Reference — The 7 Mistakes and Their Fixes
Here's a summary you can refer back to before your next restoration:
|
The Mistake |
The Fix |
|
Stopping after step one |
Complete all three steps — removal, prep, UV sealant
|
|
Skipping the surface prep |
Apply prep wipe before the UV coat, every time |
|
Using toothpaste or home remedies |
Use a purpose-built kit with UV protection included |
|
Working in direct sunlight |
Work in shade or early morning on a cool lens |
|
Too little pressure on wipe one |
Use firm circular pressure until the cloth runs clean |
|
Uneven UV coat application |
Slow overlapping strokes, full lens coverage including edges |
|
Starting on a dirty lens |
Wash and dry the lens completely before you start |
Related Guides
→ Does Toothpaste Really Restore Headlights? The Honest Answer
→ How to Restore Oxidized Headlights at Home — Full Guide
→ First-Time Results — Jessica's Experience
Frequently Asked Questions
|
Why did my headlight restoration only last a few weeks? |
|
The most likely cause is missing or rushing the UV protective sealant step. When the polycarbonate surface is cleaned but left unsealed, UV radiation starts degrading it immediately and the cloudiness returns quickly. If the prep step was also skipped, the sealant may have been applied but never properly bonded to the surface. |
|
Can I fix a failed restoration without starting from scratch? |
|
Sometimes. If the oxidation removal was thorough and the only issue was the UV coat not bonding, you may be able to clean the surface with the prep wipe and reapply the sealant only. If the oxidation was incompletely removed, however, you will need to repeat the full three-step process. |
|
Is it true that toothpaste makes headlights worse in the long run? |
|
Repeated use of toothpaste does gradually wear down the polycarbonate surface through abrasion. This makes the lens more porous and more vulnerable to future oxidation. An occasional application for a quick fix is not going to cause serious damage, but using it repeatedly over months or years does degrade the lens more quickly than it would oxidize naturally. |
|
Does weather or climate affect how long the restoration lasts? |
|
Yes, significantly. Vehicles parked outdoors in hot, sunny climates experience faster UV degradation than those kept in garages or in cooler regions. The UV sealant will still extend the result considerably, but the maintenance interval may be shorter in high-UV environments. |
|
How do I know when it's time to redo the restoration? |
|
The lens will start to look slightly less clear or develop a faint haze — usually at the edges first. At this point a single reapplication of the UV sealant is often sufficient to restore full clarity without repeating the complete three-step process. Do not wait until the lens is fully cloudy again before retreating. |
|
What is the best headlight restoration method for beginners? |
|
A pre-loaded wipe kit that includes all three steps in the correct sequence is the most beginner-friendly approach. It removes the guesswork about compound strength, applicator technique, and product compatibility. The process is the same as the professional method but packaged so that each step is clearly defined and simple to apply. |
The Bottom Line
DIY headlight restoration doesn't fail because the process doesn't work. It fails because of specific, avoidable mistakes — and almost every single failed restoration can be traced back to one of the seven listed above.
The process itself is genuinely simple: clean the lens properly, remove the oxidation with real pressure, prep the surface before sealing, and apply the UV coat completely. Do all of that correctly and the results hold. Skip any part of it and the clock on re-oxidation starts ticking from day one.
The difference between a restoration that lasts two weeks and one that lasts several months is not luck, product quality, or car age. It's whether the process was completed correctly all the way through.
If you're ready to do it right, the headlight cleaning and restoration wipes include all three steps in the correct sequence — nothing to improvise, nothing to skip. Browse the full restoration collection or check our FAQ page for anything we haven't covered here.
|
7 mistakes. Now you know how to avoid all of them. Get results that hold for months, not weeks. |