Why Headlights Turn Yellow — The Science Behind Oxidation Explained
Look at any parking lot and you'll see it: cars of every age, and somewhere in that lineup, headlights that have gone from clear to yellow. It happens to almost every vehicle eventually — and yet most drivers have never actually been told why.
The yellowing isn't dirt. It isn't something that washes off. It isn't random, and it doesn't happen because a car was poorly maintained in other ways. It's a specific, well-understood chemical process called UV oxidation, and it happens to the plastic that headlight lenses are made from — on every car, in every climate, just at different speeds.
Understanding why this happens is not just academic. It explains why some fixes work and others don't, why the problem keeps coming back for some people, and what actually needs to happen for a headlight to stay clear long-term. This article covers the full picture.

It Starts with the Material: Why Polycarbonate Replaced Glass
To understand why headlights turn yellow, you first need to understand what they're made of — and it isn't what most people assume.
Until the late 1980s and early 1990s, headlight lenses were made from glass. Glass doesn't yellow, doesn't oxidize, and is essentially immune to UV degradation. But glass is heavy, expensive to manufacture in complex shapes, and shatters on impact.
As car manufacturers moved toward more aerodynamic designs and complex headlight shapes — and as safety standards evolved — the industry shifted almost entirely to polycarbonate plastic. Polycarbonate is roughly half the weight of glass, can be moulded into virtually any shape, and is significantly more impact-resistant. For manufacturing and safety, it was a clear improvement.
But polycarbonate has a property that glass doesn't: it is vulnerable to degradation from ultraviolet radiation. Left exposed to sunlight, untreated polycarbonate will discolour and degrade within a relatively short period. Car manufacturers have always known this — which is why no headlight lens leaves the factory as bare polycarbonate.
This article focuses on why the yellowing happens. For the practical side — how to remove it once it's formed — our guide on restoring oxidized headlights at home covers the full process.
The Hardcoat: Your Headlight's Original Sunscreen
Every polycarbonate headlight lens leaves the factory with a thin protective layer applied to its outer surface — commonly referred to as a hardcoat or UV coating. This layer is the only thing standing between the raw polycarbonate and the sun.
The hardcoat is typically a few microns thick — far thinner than a human hair — but it's doing a critical job. It absorbs and blocks the ultraviolet wavelengths that would otherwise reach and degrade the polycarbonate underneath. Think of it as sunscreen for your headlights: a thin layer that, while it remains intact, protects everything beneath it.
The problem is that this layer is not permanent. Like sunscreen, it wears off over time and with continued exposure — and unlike sunscreen, nobody reapplies it. From the moment a car is driven off the lot, the hardcoat is on a slow, one-way countdown.
Every headlight ships with built-in UV protection. The yellowing you see years later isn't a design flaw — it's what happens after that protection has already worn away and nobody replaced it.
The Timeline: How Headlight Yellowing Actually Progresses
Oxidation doesn't happen overnight, and it doesn't happen on a fixed schedule — climate, parking conditions, and vehicle age all affect the speed. But the progression follows a recognizable pattern. Here's what's happening at each stage:
Years 0 to 2 — Hardcoat Intact
No visible change
The factory hardcoat is still doing its job. The lens looks the same as the day the car was purchased — clear, glossy, and fully transparent. UV radiation is being absorbed by the hardcoat before it reaches the polycarbonate underneath.
Years 2 to 5 — Hardcoat Degrading
Faint haze begins
Continuous UV exposure gradually breaks down the hardcoat. Microscopic cracks and thinning begin to appear, though they're not visible to the eye yet. Toward the end of this period, a very faint haze or slight loss of gloss may become noticeable — often dismissed as needing a wash.
Years 5 to 8 — Oxidation Begins
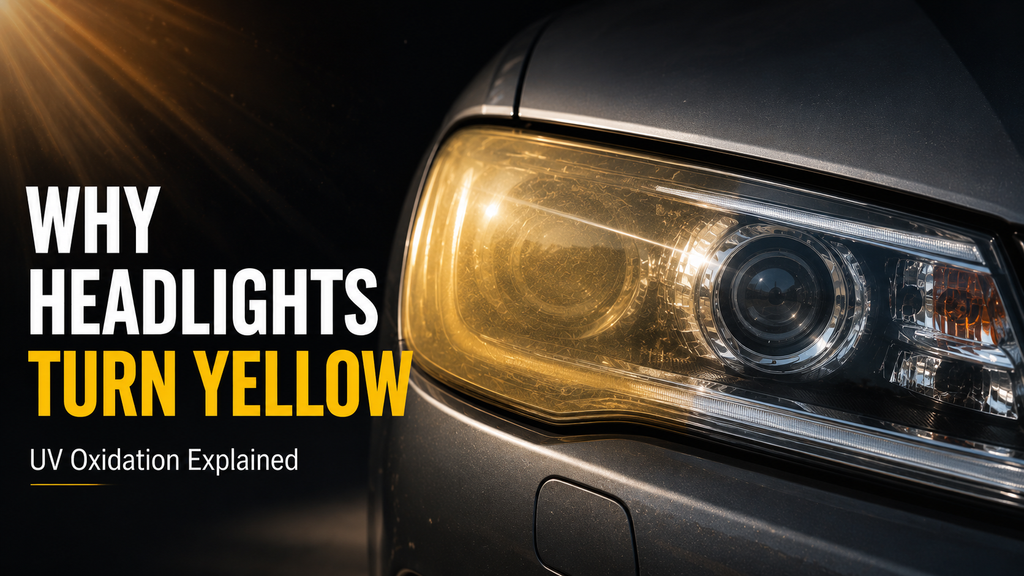
Visible yellowing and clouding
The hardcoat has broken down enough that UV radiation now reaches the polycarbonate directly. The plastic itself begins to oxidize — its molecular structure changes under UV exposure, producing the yellow discolouration and surface roughness that's now clearly visible. This is the stage at which most drivers first notice a problem.
Years 8+ — Advanced Oxidation
Heavy yellowing, possible pitting
Without intervention, oxidation continues to deepen. The surface becomes increasingly porous and rough, scattering more light and reducing night visibility further. In severe cases over many years, the surface can develop pitting or crazing as the degradation progresses beyond the outermost layer.
This timeline is approximate — vehicles in hot, sunny climates with consistent outdoor parking can move through these stages noticeably faster, sometimes reaching visible yellowing in three to four years. Vehicles garaged regularly or in cloudier regions may take a decade or longer to reach the same stage. But the direction is the same for every car: it is only a matter of when, not if.
To see what each of these stages actually looks like in practice, our before and after results guide shows real examples of light, moderate, and severe oxidation side by side.

What Speeds Up the Process — And What Slows It Down
While every polycarbonate headlight will oxidize eventually, several factors directly influence how quickly it happens:
Factors that accelerate yellowing
- Consistent outdoor parking in direct sunlight — the single biggest factor
- Hot climates, where heat compounds UV exposure and accelerates the chemical breakdown
- High altitude locations, where UV intensity is greater
- Vehicles that spend long periods stationary and exposed, such as those used infrequently
- Previous use of abrasive cleaning methods that wear down the hardcoat prematurely
Factors that slow it down
- Garage parking or covered parking, which dramatically reduces UV exposure
- Cloudier climates with less direct sunlight overall
- Regular application of a UV-protective sealant — the only way to meaningfully extend the life of the hardcoat once it begins wearing
- Avoiding abrasive cleaning products on headlight lenses
“I always assumed it was just age — like the car was getting old and that was that. Had no idea it was actually the sun breaking down a coating that wears off. Once I understood that, the fix made a lot more sense. Did the three wipes and the UV coat is basically replacing what the factory coating used to do.”
— Marcus T. 2014 Toyota Camry
Why You Can't Just Wash the Yellowing Away
This is one of the most common points of confusion. People wash their car regularly, sometimes thoroughly, and the yellowing remains completely unchanged. The reason is simple: the yellowing is not surface dirt sitting on top of the lens. It is the lens material itself that has chemically changed.
Once UV radiation has degraded the hardcoat and begun oxidizing the polycarbonate underneath, that oxidized layer is now part of the surface. It cannot be rinsed, wiped with water, or cleaned away with regular car wash products — because there's nothing sitting on the surface to remove. The discolouration and roughness are the surface.
This is also why generic glass cleaners and headlight wipes that simply clean don't fix yellowing. They can remove dust, grime, and insect residue — genuine surface contamination — but they have no effect on oxidized polycarbonate, because cleaning products aren't designed to chemically alter plastic.
To actually address yellowing, the oxidized layer itself needs to be removed — not cleaned, removed. That requires a compound that can break down and lift that degraded layer, which is fundamentally different from washing.
Can the Yellowing Actually Be Reversed?
Yes — and this is the most important part of understanding the whole process. Because the yellowing is confined to the outer surface layer of the lens, and the polycarbonate underneath is typically still in good structural condition, the oxidized layer can be removed and the lens can be resealed.
The process mirrors what happens at the factory, just done at a different point in the lens's life: remove the degraded layer, and apply a new protective UV coating in its place. This is exactly what a three-step restoration process does.
Step 1 — Remove the oxidized layer
A chemical compound dissolves and lifts the degraded, yellowed polycarbonate from the surface — the same material that's been chemically altered by years of UV exposure. This reveals the clean polycarbonate underneath.
Step 2 — Prepare the surface
The cleaned surface is prepped to remove any residue and create the right surface condition for the new protective coat to bond properly.
Step 3 — Reapply UV protection
A new UV-blocking sealant is applied — effectively replacing the original factory hardcoat that wore away over the preceding years. This is the step that determines how long the restored clarity lasts, because it's the step that puts protection back in place.
The result, when all three steps are completed, is a lens that is both visually clear and chemically protected again — much like the lens was when the car was new, before years of UV exposure wore the original coating away.
For the complete step-by-step walkthrough of this process, see our guide: How to Restore Yellow Headlights at Home.
Why Yellowing Can Come Back Faster the Second Time (If Done Wrong)
Some people who've tried to address yellow headlights before find that the problem returns faster than it took to develop originally. This isn't because the lens is somehow worse than before — it's because of what was, and wasn't, done during the previous attempt.
If a previous fix removed some of the oxidized layer — through polishing, toothpaste, or a similar abrasive method — but didn't apply any UV protection afterward, the polycarbonate is left in exactly the position it was in originally: unprotected, except now with less of its original thickness, since some of the material was physically removed.
Without the hardcoat, and now starting from a thinner base, UV radiation reaches the polycarbonate immediately and oxidation can begin again right away — sometimes faster than the original timeline, because there's no protective layer at all standing between the sun and the plastic.
This is precisely why the UV sealant step matters so much. It isn't an optional finishing touch — it's the replacement for the protection that was original to the lens and that every subsequent restoration needs to reinstate.
This exact mechanism is why toothpaste and similar home remedies often produce results that fade faster than expected. Our detailed breakdown of why toothpaste doesn't work long-term covers this in full.
Now you know why it happens — here's how to fix it.
Remove the oxidation. Reseal the surface. Done in minutes.
→ Get the Headlight Cleaning and Restoration Wipes
Related Guides
- How to Restore Yellow Headlights at Home — Step-by-Step Guide
- How to Restore Oxidized Headlights at Home
- Does Toothpaste Really Restore Headlights? The Honest Answer
- Headlight Restoration Before and After — Results at Every Stage
- Headlight Restoration Cost — DIY vs Professional vs Replacement
Frequently Asked Questions
The Bottom Line
Yellow headlights are not a flaw, bad luck, or a sign of neglect. They are the predictable result of a thin protective coating wearing away under years of UV exposure — something that happens to every polycarbonate headlight lens on every car eventually.
The good news is that the same logic that explains the problem also explains the solution. The factory provided UV protection once. Restoring that protection — after removing the oxidized layer that formed in its absence — returns the lens to the same clear, protected state it started in.
Once you understand that the yellowing is reversible and that the key to lasting results is reapplying UV protection, the rest of the process is simple.
The headlight cleaning and restoration wipes handle all three steps — removal, preparation, and UV resealing — in one kit. Browse the full restoration collection or visit our FAQ page for anything not covered here.
Understand the problem. Now fix it.
Three wipes. Five minutes. Protection restored.
→ Shop the Headlight Restoration Kit