3-Step Headlight Restoration at Home — No Detailer Needed
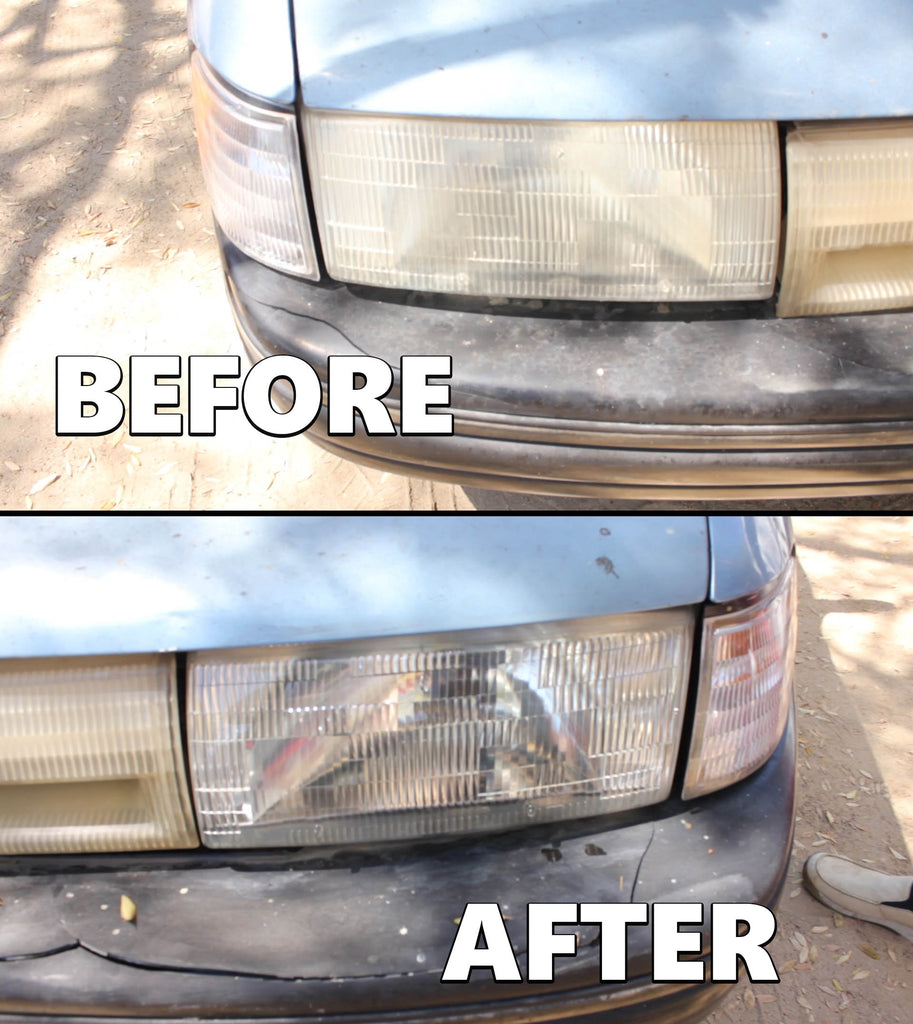
If you've ever squinted at your car's foggy, yellowed headlights and assumed a detailer was the only solution — you've been misled. Professional detailers aren't using secret machines or magic formulas locked behind a trade counter. They're using a simple three-step wipe system that takes under two minutes per headlight. The same kit. The same process. Done at home, at a fraction of the cost.
This guide walks you through exactly how it works, why it lasts, and what you need to get the same results as a $300 professional job — without booking an appointment or leaving your driveway.

|
Why Do Headlights Turn Yellow and Foggy?
Modern headlight lenses are made from polycarbonate plastic — strong, lightweight, and impact-resistant. But polycarbonate has one critical weakness: UV radiation. From the day your car leaves the factory, sunlight is slowly breaking down the outer hardcoat layer protecting the lens.
Over months and years, that degradation turns into visible oxidation. The lens becomes cloudy, yellowed, and rough to the touch. This process accelerates if your car is parked outdoors regularly, lives in a sunny climate, or hasn't had any protective treatment applied.
The result is what detailers call oxidized headlights — and it's more than cosmetic. Oxidation scatters light instead of projecting it forward, which meaningfully reduces how far your headlights reach at night. Studies have shown that severely oxidized headlights can reduce forward visibility by up to 80% compared to clear lenses.
The good news: oxidation sits on the surface. It can be removed — and the lens can be resealed — without replacing the entire assembly.
The 3-Wipe Method — How It Actually Works
This is the process professional detailers use. It works because it addresses all three stages of the problem: removal, preparation, and protection. Skip any one step and the results don't last.
Wipe 1 — Strip the Oxidation
The first wipe uses a chemical compound specifically formulated to dissolve and lift oxidized polycarbonate from the lens surface. Work in small circular motions across the entire headlight. Within seconds you'll see a yellowy, filmy residue transferring onto the cloth — that's the oxidized layer releasing. Continue until the cloth comes away clean. This step alone makes a dramatic difference. But the lens is now raw and completely unprotected, which is why most DIY attempts that stop here only last a week or two before the cloudiness returns.
Wipe 2 — Clean and Prep the Surface
The second wipe removes compound residue, surface oils, and any remaining contaminants. This isn't just about cleanliness — it's about adhesion. The polycarbonate surface needs to be chemically neutral and free of any barrier before the UV sealant can bond properly. Skipping this step is the most common reason DIY headlight restorations fade quickly. The sealant can't grip the surface if there's compound residue underneath it.
Wipe 3 — Apply the UV Sealant
This is what separates a restoration that lasts months from one that lasts days. The third wipe lays down a UV-blocking protective coat directly onto the clean polycarbonate. This sealant does two things: it gives the lens a glossy, optically clear finish, and it shields the surface from the UV radiation that caused the oxidation in the first place. Applied correctly, it bonds to the lens and stays clear for months — not just a few days like toothpaste or generic polish methods.

|
Can You Restore Headlights Without Sanding?
Yes — and for most cases of oxidation, you should. Sanding is an aggressive method that physically abrades the lens surface to remove the oxidized layer. It works, but it also removes material from the lens itself, which shortens its lifespan and requires progressively finer grits (400, 800, 1500, 2000, 3000) to avoid leaving visible scratches. Done incorrectly, sanding can permanently damage headlight lenses.
The chemical wipe method used in this kit is a no-sanding headlight restoration approach that achieves the same result without any of that risk. The oxidation compound dissolves the degraded layer chemically rather than abrading it physically. For light to moderate oxidation — which covers the vast majority of consumer cases — the chemical method is faster, safer, and just as effective.
Sanding is really only necessary for severe, deeply pitted oxidation that hasn't been treated for many years. If your headlights are cloudy or yellowed but the surface is still relatively smooth, the 3-wipe method will fully restore them.
DIY vs Professional Headlight Restoration
Here's the honest comparison:
|
DIY (3-Wipe Kit) |
Professional Detailer |
Cost |
Under $20 for full kit |
$150–$300 per visit |
Time |
Under 5 minutes |
Drop off + wait |
Results |
Same professional quality |
Same professional quality |
Lasts |
Months with UV coat |
Months (same method) |
Sanding |
Not required |
Sometimes used |
Convenience |
At home, anytime |
Appointment needed |
The process detailers use is the same three-step system. The difference is you're doing it yourself, in five minutes, without the appointment or the bill.
How Long Does Headlight Restoration Last?
With a proper UV sealant applied as the final step, results typically last several months under normal driving conditions. The exact duration depends on how much UV exposure your vehicle gets — cars parked outdoors in sunny climates will need retreating sooner than those kept in a garage.
The key factor is the UV coat. Restoration methods that skip the sealant step — including many toothpaste tricks and generic polish methods you'll find online — may clear the lens temporarily, but without UV protection, the polycarbonate re-oxidizes quickly, often within a few weeks.
When the lens starts to look slightly less clear after several months, a single maintenance wipe with the UV sealant (wipe 3) is usually all that's needed to restore clarity — you don't need to start the full process from scratch every time.
How Clear Headlights Improve Your Night Visibility
This is often underestimated. A cloudy headlight lens doesn't just look bad — it physically blocks and scatters the light your bulb produces. Instead of a directed beam projecting forward, oxidized lenses create a diffuse glow that illuminates less of the road ahead.
Restoring the lens to optical clarity means your existing bulbs project their full output where it's supposed to go. Many drivers report that their car feels like it has new, brighter bulbs after a restoration — but the bulbs haven't changed. The light path has simply been cleared.
For anyone who drives regularly at night or in low-visibility conditions, clear headlights are a meaningful safety improvement, not just a cosmetic one.
What You Need — No Special Tools Required
The complete kit contains everything for both headlights:
- Oxidation removal compound (Wipe 1)
- Surface prep cloth (Wipe 2)
- UV protective sealant (Wipe 3)
- Application instructions
No sanding blocks. No polishing machines. No special protective gear. The entire process takes place by hand, and the kit is designed so that anyone can follow the three steps in order and get professional results.
The complete headlight restoration kit includes all three wipes and covers both headlights in a single application — with product to spare for a maintenance coat a few months later.
|
Restore your headlights in minutes — no sanding, no tools, no expensive detailer. |
Frequently Asked Questions
How long does headlight restoration last? |
With the UV sealant applied correctly as the final step, results typically last several months. Exposure to intense sunlight or extreme weather can shorten this. When you notice the lens starting to dull again, a single wipe with the sealant is usually enough to restore clarity without repeating the full process. |
Does this work on all car headlights? |
The 3-wipe method works on polycarbonate headlight lenses, which covers virtually all cars manufactured after the mid-1990s. It does not restore glass lenses (found on older vehicles) or lenses that are cracked or physically damaged — those require replacement. |
Do I need to sand my headlights? |
No. For light to moderate oxidation, the chemical wipe method is fully effective without any sanding. Sanding is only necessary for severe, deeply pitted lenses that have gone untreated for many years. The chemical compound in this kit dissolves and lifts the oxidized layer without removing material from the lens itself. |
Can I do this myself with no experience? |
Yes — that's exactly what this kit is designed for. There are no special skills, tools, or mechanical knowledge required. You follow three steps in order: wipe, clean, seal. Most people complete both headlights in under five minutes on their first attempt. |
Is this the same product detailers use? |
The process is identical to the professional method — oxidation removal, surface prep, and UV sealing. The chemistry is the same. The difference is you're applying it yourself at home rather than paying a detailer $150–$300 to do it for you. |
What if my headlights go foggy again? |
Re-oxidation after a proper restoration is usually caused by UV exposure over time. When this happens, you typically only need to reapply the UV sealant (wipe 3) rather than starting the full three-step process again. One kit provides enough product for a full restoration plus a follow-up maintenance coat. |

|
The Bottom Line
Cloudy, oxidized headlights are a fixable problem — and you don't need a detailer, a sanding kit, or an afternoon to fix them. The three-wipe method works because it addresses the problem at every level: it removes the existing oxidation, prepares the surface for proper bonding, and seals the lens with UV protection that prevents the damage from recurring quickly.
The results are indistinguishable from a professional job, because it is the professional process. Get the complete kit and restore both headlights in the time it would take you to call a detailer.
|
Restore your headlights in minutes — no sanding, no tools, no expensive detailer. |