How to Restore Oxidized Headlights at Home — No Sanding Required
Oxidized headlights are one of the most common — and most overlooked — problems on older cars. The lenses start clear, gradually turn yellow, then foggy, and at each stage the change is subtle enough that most drivers simply adjust and stop noticing. Until one day they see a car the same age as theirs with lenses that look factory new, and they realize just how far things have gone.
The good news: oxidation is a surface problem. It happens on the outer layer of the polycarbonate lens, not inside it — which means it can be fully reversed at home, without replacing the headlight, without sanding, and without booking a detailer.
This guide covers everything: why oxidation happens, how to remove it the right way, what makes results last, and exactly what you need to do it yourself in under five minutes per headlight.

Why Do Plastic Headlights Turn Yellow and Oxidize?
Since the 1990s, virtually all car headlight lenses have been made from polycarbonate plastic. Polycarbonate is lighter and more impact-resistant than glass — but it has one weakness glass doesn't: it degrades under UV radiation.
Every car that leaves the factory has a UV-protective hardcoat applied over the polycarbonate lens. This coating keeps the lens clear, glossy, and resistant to yellowing. Over time — typically two to five years depending on sun exposure and climate — UV radiation breaks down this hardcoat. Once it's gone, the unprotected polycarbonate beneath starts to oxidize: turning yellow, hazing over, and becoming rough and porous on the surface.
The process is slow enough that most drivers don't notice it happening. But the effects are real:
- Visibility at night drops significantly as oxidized lenses scatter light instead of projecting it forward
- The car looks older and less maintained, which affects resale value
- In some states and countries, severely cloudy headlights can cause a vehicle to fail safety or roadworthy inspections
The critical thing to understand is that this damage is on the surface. The polycarbonate underneath is usually still structurally sound — which means the lens can be restored rather than replaced.
Have questions about whether your headlights could affect your next roadworthy check? Our FAQ page covers headlight condition and inspection requirements.
How to Tell If Your Headlights Are Oxidized — The Three Stages
Not all cloudy headlights are the same. Before treating them, it helps to understand what stage of oxidation you're dealing with:
Stage 1 — Light Oxidation
The lens looks slightly hazy or has a faint yellow tint but is still mostly transparent. This is the easiest stage to treat and produces the most dramatic results with the 3-wipe method. Most cars between 3 and 7 years old with outdoor exposure fall into this category.
Stage 2 — Moderate Oxidation
The lens is visibly yellow and cloudy, with a noticeably rough surface when you run a finger across it. Night visibility is meaningfully reduced. The 3-wipe method works fully at this stage — wipe one may need a second pass on the heaviest areas before moving to wipe two.
Stage 3 — Severe Oxidation
The lens is deeply yellowed, heavily frosted, and may have visible pitting on the surface. This usually means the headlights have gone untreated for many years. The 3-wipe method will improve them significantly, though complete restoration may require multiple applications of wipe one. If the lens is physically cracked or damaged, replacement is the better option.

How to Restore Oxidized Headlights at Home — Step by Step
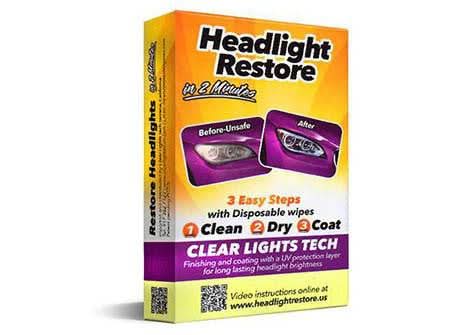
The professional method for restoring oxidized headlights is a three-step process. Each step does a specific job, and the order matters. Skipping any step — especially the final UV sealant — is why most DIY attempts don't produce lasting results.
Step 1 — Remove the Oxidation
Apply the oxidation removal compound using wipe one and work in firm, circular motions across the full lens surface. Within seconds you will see yellow-brown residue transferring onto the cloth — that is the degraded hardcoat and oxidized polycarbonate lifting away. Keep working until the cloth comes away clean. The lens will look dramatically clearer at this point. But the surface is now raw and completely exposed. Do not stop here.
Step 2 — Clean and Prep the Surface
Wipe two removes all compound residue and surface contaminants, leaving the polycarbonate chemically clean and ready to bond with the sealant. This step is critical for adhesion. If any residue from step one remains on the lens, the UV coat in step three cannot bond properly and will wear off within days instead of lasting months. Thirty seconds of thorough coverage is all this step needs.
Step 3 — Apply UV Protection
Wipe three applies a UV-blocking protective coat that replaces the original hardcoat worn away by years of sun exposure. This restores the glossy, optically clear appearance and seals the polycarbonate against the UV radiation that caused the oxidation in the first place. Without this step, the lens is clean but completely defenceless against re-oxidation. With it, results last several months. This is what makes the professional method work where generic polishes and home remedies don't.
For a visual walkthrough with real customer results and application photos, check out our full testimonials page here.
Can You Restore Oxidized Headlights Without Sanding?
Yes — and for the vast majority of vehicles, the chemical wipe method is the better approach.
Sanding works by physically abrading the lens surface to remove the oxidized layer. It can be effective but comes with real risks: it removes material from the lens itself, requires multiple sandpaper grits (typically 400 through 3000) to avoid visible scratching, and can permanently damage the lens if done incorrectly. It is also significantly more time-consuming.
The chemical approach dissolves the oxidized layer rather than grinding it away. For light to moderate oxidation — which covers the majority of vehicles — this produces equivalent results with none of the risk. No equipment, no progressive grit stages, no risk of scratching.
Sanding is only genuinely necessary for severely pitted lenses that have been left untreated for many years. If your lenses are cloudy or yellow but still relatively smooth to the touch, the chemical wipe method will restore them fully.
We cover the no-sanding approach in detail in our earlier guide: The 3-Wipe Headlight Restoration Method Explained.
Professional vs DIY Headlight Restoration — Honest Comparison
Professional detailers use the same three-stage process: oxidation removal, surface preparation, and UV sealing. The chemistry is identical. The results are equivalent. The only difference is that you are applying it yourself, in your driveway, in under five minutes, for a fraction of the cost.
| DIY 3-Wipe Kit | Professional Detailer | |
|---|---|---|
| Cost | Under $30 for full kit | $150 to $300 per visit |
| Time | Under 5 min both headlights | Drop-off plus wait time |
| Process | Same 3-step method | Same 3-step method |
| Results | Professional quality | Professional quality |
| UV protection | Included in wipe 3 | Included |
| Lasts | Several months | Several months |
| Convenience | At home anytime | Appointment needed |
The only scenario where a professional has a meaningful advantage is with severely pitted lenses requiring machine sanding — a situation that applies to a small minority of vehicles.
See how one driver tested the kit on one headlight first and saw the difference side by side.
How Long Does Headlight Restoration Last?
With the UV sealant properly applied as the final step, results typically last several months under normal driving conditions. The key variable is UV exposure: vehicles parked outdoors in sunny climates will see more rapid re-oxidation than those kept in a garage or in less intense sunlight.
The UV coat in wipe three is what separates a restoration that lasts months from one that fades in two weeks. It is not optional — it is the entire point of the third step.
When the lens begins to look slightly less clear after several months, a single reapplication of wipe three — the UV sealant only — is usually enough to restore full clarity. You do not need to repeat the complete three-step process every time. One kit provides enough product for both headlights plus a follow-up maintenance coat months later.
Compare this to toothpaste, baking soda, or generic polish methods — none of which include UV protection. Those approaches may clear the lens temporarily, but re-oxidation typically starts within two to four weeks because the surface is left completely unprotected.
What You Need to Restore Oxidized Headlights — Nothing Extra
The complete kit includes everything required for both headlights:
- Oxidation removal compound wipe — Step 1
- Surface prep and cleaning wipe — Step 2
- UV protective sealant wipe — Step 3
No sandpaper, no polishing machine, no applicator pads, no detailing experience. The wipes are pre-loaded with the correct compound for each stage. The process is designed to be completed by anyone in under five minutes.
The headlight cleaning and restoration wipes are available individually or as part of our full restoration collection. One kit covers both headlights.
The kit is also available on Amazon with Prime delivery.
Tips for Getting the Best Results from Your First Restoration
The 3-wipe method is straightforward, but these details make a real difference — especially for more heavily oxidized lenses:
- Work in shade or indoors where possible. Direct sunlight can cause the compound in wipe one to dry too quickly before it has fully lifted the oxidation.
- Use firm, circular pressure on wipe one. Light pressure will not lift heavier oxidation effectively — work until you see residue transferring clearly onto the cloth.
- Cover the full lens surface on wipe two. Any area missed will prevent the sealant from bonding evenly.
- Apply wipe three in smooth, even strokes and allow a few minutes to cure before exposure to water or direct sunlight.
- For moderate to heavy oxidation, repeat wipe one on the worst areas before moving to wipe two.
Restore your oxidized headlights at home —
no sanding, no detailer, no experience needed.

Frequently Asked Questions — Restoring Oxidized Headlights at Home
The Bottom Line
Oxidized headlights are one of the most fixable problems on any car — and one of the most neglected, because the change happens gradually enough that most drivers stop noticing it. But the effect on night visibility, the car's appearance, and in some cases its roadworthiness is real.
The 3-wipe method works because it treats the problem completely: removal, preparation, and UV protection. It is the same process professional detailers use, available in a kit that takes five minutes and costs a fraction of a professional job.
If your headlights are cloudy, yellow, or foggy, the headlight cleaning and restoration wipes are the most direct way to fix them. Browse the full restoration collection or visit our FAQ page if you have questions before ordering.
Clear headlights in under 5 minutes —
affordable, effective, and no experience needed.