
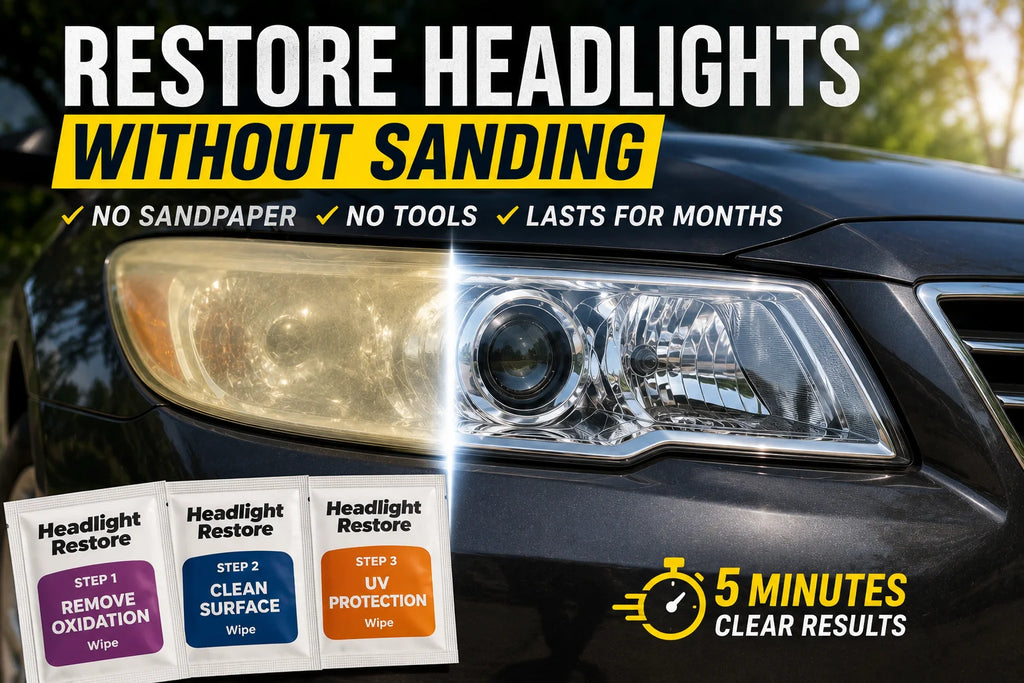
How to Restore Headlights Without Sanding — Easy Method That Lasts
If you've searched for how to restore headlights, you've probably come across a lot of guides recommending sanding. Multiple sandpaper grits, a wet sanding technique, then polishing, then sealing — it sounds like a half-day project that requires both skill and equipment most people don't have lying around.
Here's the thing: for the vast majority of drivers, sanding is completely unnecessary. Light to moderate oxidation — which is what most cloudy or yellow headlights actually have — can be fully removed using a chemical compound that dissolves the degraded layer rather than grinding it away. No sandpaper, no drill, no technique to learn, no risk of accidentally scratching the lens.
The no-sanding method produces professional-quality results in about two minutes per headlight, and because it includes a UV sealant as the final step, those results last months rather than weeks. This article explains exactly how it works and how to do it.
Methods at a Glance — With and Without Sanding
Here's a quick comparison of every major restoration method so you can see exactly where the no-sanding approach sits:
| Method | Sanding? | Tools? | Results Last | Scratch Risk |
| Chemical wipe kit ★ | No | None | 3–6 months | None |
| Wet sanding | Yes (multi-grit) | Sandpaper + drill | 3–6 months | High if rushed |
| Drill attachment kit | Abrasive pads | Drill required | 3–6 months | Moderate |
| Toothpaste / baking soda | Mild abrasion | None | 1–3 weeks | Low but repetitive |
| WD-40 / spray | No | None | Days | None |
★ Chemical wipe kit: no sanding, no tools, no scratch risk — the fastest and safest method for light to moderate oxidation, which covers most vehicles.

Why Sanding Isn't Necessary for Most Headlights
Sanding works by physically abrading the outer surface of the headlight lens, progressively removing material until the oxidized layer is gone. It's the oldest method — it predates chemical alternatives and it does work when done correctly. But it has significant drawbacks that make it the wrong tool for most situations.
First, sanding removes polycarbonate material from the lens permanently. Each grit progression takes a little more off the surface, and over time — especially with repeated restorations — this thins the lens. Second, sanding requires skill and patience. The wrong grit, too much pressure, or uneven strokes leaves visible scratch marks that need further polishing to remove. Third, and most importantly, sanding alone produces a result that fades just as quickly as any other method unless a UV sealant is applied afterward — meaning the extra time and risk doesn't actually change the longevity of the result.
Chemical oxidation removal works differently. Rather than abrading the surface, the compound in the first wipe dissolves and lifts the oxidized layer chemically. The polycarbonate underneath is left clean and intact — no material removed, no abrasion marks, no skill required. The process is faster, safer for the lens, and produces equivalent results for light to moderate oxidation, which describes the vast majority of cases.
|
Sanding is a mechanical solution to a chemical problem. The oxidation on a headlight lens is a chemical process — UV degradation of polycarbonate. Dissolving it chemically is faster, safer, and produces the same result without any of the risk. |
When Is Sanding Actually Necessary?
To be fair and accurate: sanding does have a place. It becomes genuinely useful for severe, deeply pitted oxidation that has been left untreated for many years — cases where the polycarbonate surface has physical texture or crazing that chemical removal alone cannot fully address in a single treatment.
For the practical majority of drivers — anyone whose headlights are yellow, cloudy, hazy, or visibly oxidized but whose surface still feels relatively smooth — chemical restoration works completely without any abrasion. If you're unsure which category you're in, run a finger across the lens. If it feels rough or gritty but the texture is uniform rather than deeply pitted, chemical removal will work. If the surface has clearly developed physical channels or craters, multiple chemical passes may still be enough before considering abrasion.
Our guide on what makes the best headlight restoration kit covers the sanding vs chemical comparison in detail — including the specific situations where each approach is the right call.
How to Restore Headlights Without Sanding — Step by Step
This is the complete no-sanding process using the 3-wipe chemical method. Total time about two minutes per headlight. No tools, no preparation other than washing the lens, no experience required.
|
Step 1 Wash and Dry the Lens Start with a clean, dry headlight. Rinse away any surface dirt, road grime, or insect residue with clean water and let it dry completely. Surface contamination reduces how effectively the compound contacts the oxidized layer — sixty seconds here improves the quality of the result. Pro tip: Use clean water only, no soap. Detergent residue can interfere with the compound in wipe one. |
|
Step 2 Remove the Oxidation — Wipe 1 Apply the oxidation removal compound from the first wipe across the full lens surface using firm, circular pressure. Within seconds you'll see yellow or brownish residue transferring onto the cloth — that's the oxidized polycarbonate dissolving and lifting away from the surface. Keep working with consistent pressure across the entire lens until the cloth runs completely clean. For more heavily oxidized lenses, a second pass of wipe one on the worst areas before moving on is more effective than rushing to the next step. Pro tip: Don't stop because the lens looks better. Work until the cloth genuinely runs clean — unfinished removal on step one is the most common cause of patchy results. |
|
Step 3 Prep the Surface — Wipe 2 The second wipe removes compound residue from wipe one and leaves the polycarbonate surface chemically neutral and ready to bond with the UV sealant. This step looks like a simple cleanup, but it's critical — compound residue left on the lens prevents the sealant in step three from adhering properly. Apply across the full surface including corners and edges. Thirty seconds, full coverage. Pro tip: Don't skip the corners. Any area missed here will have weaker UV protection and may re-oxidize faster than the rest of the lens. |
|
Step 4 Seal with UV Protection — Wipe 3 The third wipe applies a UV-blocking protective coat over the clean, prepared polycarbonate surface. This is the step that determines how long the result lasts. Applied in slow overlapping strokes with full coverage, it replaces the factory hardcoat that UV radiation wore away — protecting the lens against the same sun damage that caused the oxidation in the first place. With the sealant correctly applied, results hold for three to six months; when the lens starts to dull again, simply repeat the full three-step process. Pro tip: Allow the sealant three to five minutes to cure before any water contact or direct sun exposure. Don't wipe or touch the surface during this time. |
For a more detailed explanation of what each wipe is doing chemically and why the process works, our complete 3-wipe headlight restoration guide covers the full picture.

|
"I watched three YouTube videos about sanding headlights and got intimidated by the number of sandpaper grits. Tried the wipe kit instead on a whim. Took four minutes. Headlights look exactly like the sanding videos I watched — clear and glossy — without any of the drama. Why does everyone recommend sanding?" — Chris D. 2014 Ford Escape |
No-Sanding vs Sanding — The Practical Difference
For a driver choosing between these two approaches for a typical cloudy headlight, here's the practical reality:
No-sanding chemical method
- Time: under two minutes per headlight
- Equipment: nothing beyond the kit
- Skill level: none — follow three labelled steps
- Risk of damaging the lens: none — no abrasion involved
- Result longevity: three to six months with UV sealant
- Works best on: light to moderate oxidation — the majority of cases
Wet sanding method
- Time: thirty to sixty minutes per headlight including progressive grits
- Equipment: multiple sandpaper grits (400 through 3000), masking tape, water source
- Skill level: moderate — uneven pressure or wrong grit leaves visible scratches
- Risk of damaging the lens: real — over-sanding removes material permanently
- Result longevity: three to six months with UV sealant — the same, if the sealant is included
- Works best on: severe, deeply pitted oxidation that chemical removal cannot fully address
The results when both are done correctly are equivalent. The difference is entirely in the time, equipment, skill, and risk — all of which favour the chemical method for the typical driver dealing with typical headlight oxidation.
Want to see what "equivalent" actually looks like on real cars? Our headlight restoration before and after photos show customer results from the no-sanding method at light, moderate, and severe oxidation — so you can judge the finish for yourself rather than take our word for it.
How Long Do the Results Last Without Sanding?
This is the question most drivers have when considering the no-sanding approach — the assumption that sanding somehow produces more durable results. It doesn't. The longevity of headlight restoration is determined entirely by the UV sealant, not by how the oxidation was removed.
A chemical restoration with UV sealant and a sanding restoration with UV sealant last exactly the same amount of time — three to six months under normal conditions. A sanding restoration without UV sealant fades at the same rate as a chemical restoration without UV sealant — within weeks. The removal method is irrelevant to longevity. The sealant is everything.
For the complete breakdown of what determines how long restoration results hold, and how to maintain them between full treatments, see our guide on how long headlight restoration lasts.
|
"My neighbour sanded his headlights last summer — took him nearly an hour and he scratched one of them slightly with the wrong grit. Mine took five minutes with the wipe kit. His look great, mine look great. The difference is I didn't stress about it and I didn't accidentally scratch anything." — Karen W. 2016 Nissan Rogue |
|


Common Questions About No-Sanding Headlight Restoration
Will the no-sanding method work on my headlights?
For light to moderate oxidation — yellow, cloudy, or hazy lenses with a rough but relatively uniform surface — yes, completely. If your lenses have been untreated for many years and have developed deep pitting or crazing, a chemical approach still produces a significant improvement, though it may need two treatments to fully complete.
Is the result really as good as sanding?
For light to moderate oxidation, yes — the optical result is equivalent. Both methods remove the oxidized layer and restore the underlying polycarbonate surface. The difference is in how that removal happens: chemical dissolution vs mechanical abrasion. The end point, a clean polycarbonate surface ready for UV sealing, is the same.
What if I've already tried a no-sanding product and it didn't last?
This almost always means the previous product didn't include a UV sealant, or the sealant wasn't applied over a properly prepped surface. A product that removes oxidation without sealing the lens leaves the polycarbonate completely exposed to UV radiation — re-oxidation starts immediately. Make sure any kit you use includes all three stages: removal, preparation, and UV sealing.
Our article on why DIY headlight restoration fails covers every common mistake — including the missing UV sealant issue that causes most short-lived results regardless of method.
Related Guides
→ How to Restore Yellow Headlights at Home — Step-by-Step Guide
→ How to Restore Oxidized Headlights at Home
→ Headlight Restoration Before and After — Results at Every Oxidation Level
→ How Long Does Headlight Restoration Last?
→ Best Headlight Restoration Kit — What to Look For
→ Headlight Restoration vs Replacement
→ DIY Headlight Restoration: The Complete Guide (2026)
Frequently Asked Questions
|
Can you really restore headlights without sanding? |
|
Yes. For light to moderate oxidation — which describes most cloudy or yellow headlights — a chemical wipe kit removes the oxidized layer without any abrasion and produces equivalent results to sanding in a fraction of the time. The key is using a kit that includes all three stages: oxidation removal, surface preparation, and UV sealing. |
|
How long does the no-sanding method take? |
|
About two minutes per headlight. Each headlight typically takes ninety seconds to two minutes for the three-wipe process, plus three to five minutes cure time for the UV sealant before driving or water exposure. |
|
Does the no-sanding method last as long as sanding? |
|
Yes — with UV sealant applied correctly as the final step. Longevity is determined by the UV protective coat, not by how the oxidation was removed. Both methods with proper UV sealing produce results lasting three to six months. Both methods without UV sealing fade within weeks. The removal method is irrelevant to duration. |
|
Are there any headlights the no-sanding method won't work on? |
|
The chemical method is less effective on lenses with very deep, long-term pitting — severe oxidation from vehicles untreated for many years. In those cases, the chemical approach still produces significant improvement but may need two treatments to complete fully, or occasional targeted sanding on deeply pitted areas before chemical treatment of the rest. For the vast majority of cloudy or yellow headlights, chemical removal works completely. |
|
What's the biggest mistake people make with no-sanding restoration? |
|
Stopping after wipe one. The lens looks dramatically cleaner immediately after the oxidation removal step, which tempts many people to call it done. But without the prep step and UV sealant, the clean polycarbonate re-oxidizes within weeks. All three steps are required for lasting results. |
|
Do I need to protect my car's paint when restoring headlights without sanding? |
|
With a chemical wipe kit, minimal masking is needed compared to wet sanding, which can splash and potentially affect surrounding paint. It's good practice to keep the compound wipe away from painted surfaces and to wipe away any compound that transfers to paint immediately. But the risk of paint damage is significantly lower with the chemical method than with any abrasive approach. |
The Bottom Line
For most drivers with cloudy, yellow, or foggy headlights, sanding is not the answer — it's just the answer that's been around the longest. Chemical oxidation removal is faster, safer, requires no tools or experience, and produces the same optical result in a fraction of the time.
The no-sanding method works because it addresses the same problem from a different angle: dissolving the degraded surface layer rather than grinding it away. Add a UV sealant as the final step, and the result holds for months — exactly as long as a sanding restoration with the same sealant.
If you've been putting off headlight restoration because the sanding guides looked complicated, the simpler method was always available. And as with most maintenance tasks, the earlier you act, the easier it is — prevention is always easier than restoration, and restoration without sanding is always easier than with it.
The headlight cleaning and restoration wipes include all three steps — removal, preparation, and UV sealing — in one kit for under $30. Browse the full restoration collection or check the FAQ page for anything not covered here.
|
Skip the sandpaper. Get the same result. Two minutes. No tools. Professional clarity. |