How to Restore Yellow Headlights at Home — Step-by-Step Guide
If your headlights have turned yellow, you are not alone — and you do not need a detailer, a sanding kit, or a replacement assembly to fix it.
Yellow headlights are caused by UV radiation breaking down the protective outer layer on polycarbonate headlight lenses. It happens gradually on almost every car manufactured after the mid-1990s, and the fix is straightforward when you understand what the problem actually is and how to address it properly.
This guide walks through the complete process — why headlights turn yellow, what works and what does not, and a step-by-step breakdown of how to restore them at home in under five minutes with no prior experience.
 |
Why Do Headlights Turn Yellow in the First Place?
The yellowing is not random and it is not inevitable — it is a specific chemical process called UV oxidation, and understanding it is the key to fixing it properly.
Modern headlight lenses are made from polycarbonate plastic, not glass. Polycarbonate is lighter, cheaper to manufacture, and far more impact-resistant. But it has a weakness that glass does not: it breaks down under ultraviolet radiation.
Every car that rolls off the production line has a UV-protective hardcoat applied to the outer surface of the polycarbonate lens. This coating is what keeps the lens crystal clear in the early years. The problem is that it is not permanent. Sunlight, heat, and environmental exposure gradually degrade this hardcoat over time — typically beginning to show visibly after two to five years of outdoor parking.
Once the hardcoat is gone, the unprotected polycarbonate beneath it starts to oxidize. This is the physical process that causes the yellowing: the surface becomes rough, porous, and discoloured as the polycarbonate degrades. The haze deepens over time, the lens scatters rather than projects light, and the car looks noticeably older than it is.
The important thing to understand here is that the yellowing is a surface condition. The polycarbonate underneath is usually still structurally sound. You do not need to replace the headlight — you need to remove the degraded surface layer and reseal the lens so the UV damage cannot restart immediately.
For a more detailed explanation of how polycarbonate oxidation progresses through different stages — from slight haze to severe yellowing — our guide on restoring oxidized headlights at home covers the full picture.
Can Yellow Headlights Actually Be Made Clear Again?
Yes — in the vast majority of cases, completely. Yellow headlights that have been caused by surface UV oxidation can be fully restored to optical clarity. The yellowing sits on the outer layer of the lens, and when that layer is properly removed and the surface is resealed, the result is a lens that looks and performs like new.
The exceptions are few but worth knowing: if the lens is physically cracked, if the yellowing is coming from inside the housing rather than the outer surface, or if the polycarbonate has been so severely degraded over many years that pitting has formed deep into the surface, restoration may produce a major improvement without reaching a complete result. In those cases, a second treatment or eventual replacement may be required.
For the typical case — a car between 3 and 12 years old with surface oxidation — restoration works completely and the results are immediate.
|
“I genuinely thought these headlights were done for. They were so yellow I stopped noticing them. Did the three wipes in about four minutes and I couldn’t stop looking at them afterwards. They look like a different car.” — Craig B. 2013 Ford Focus, surface oxidation |
What Does Not Work — And Why
Before covering the correct method, it is worth addressing the alternatives that are widely recommended online — because understanding why they fail is directly connected to understanding why the right method succeeds.
Toothpaste
Toothpaste is a mild abrasive. It scrubs away some of the yellowed surface layer through friction, which produces a visible improvement — but it contains no UV protection. The exposed polycarbonate re-oxidizes within two to four weeks because there is nothing to stop sunlight from degrading it again immediately after cleaning.
WD-40 and similar lubricants
These temporarily fill surface micro-scratches and haze, making the lens appear clearer for a few days. The effect evaporates with the product. No abrasion, no UV protection, no lasting benefit whatsoever.
Sanding
Sanding can work — but it is the most aggressive approach and carries real risk of permanent lens damage if done incorrectly. It removes material from the polycarbonate itself, requires multiple grits, and still needs a UV protective coat at the end or the result will fade. For light to moderate yellowing, chemical removal is the safer and faster option.
Single-step polish kits
Products that include only a polish or compound without a UV sealant as the final step will produce a clear lens on day one. Without UV protection, re-oxidation begins immediately and the yellowing returns within weeks. The polish does the first job correctly — the absence of the sealant is what causes the failure.
We tested the toothpaste method in detail and explained exactly why the result disappears so quickly. Read the full comparison here.
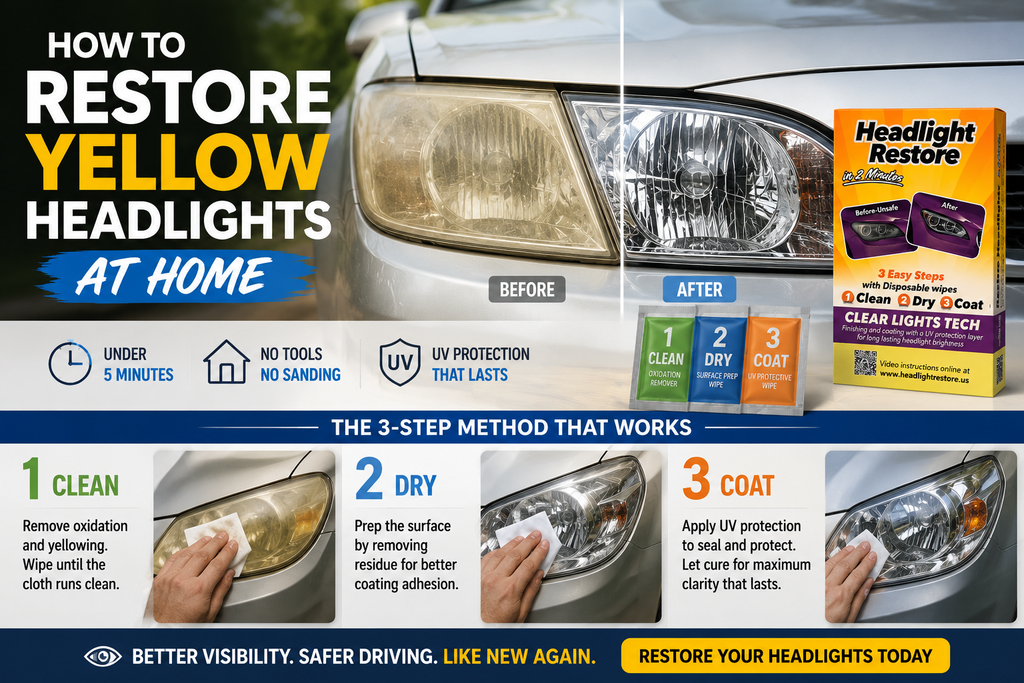
How to Restore Yellow Headlights at Home — Step by Step
This is the complete professional process for restoring yellow headlights at home. The same three-stage method used by detailers, in a kit that requires no tools, no experience, and no preparation beyond washing the lens.
Total time: under five minutes for both headlights. The steps must be done in order.
|
Step 1
Wash and Dry the Lens
Start with a clean, dry lens. Rinse off any surface dirt, road grime, or residue with clean water and allow it to dry completely. Any surface contamination will reduce how effectively the compound in step two contacts the oxidized layer. This takes sixty seconds and makes a real difference to the quality of the result. Pro tip: Do not use soap or detergent — just clean water. Soap residue can interfere with the compound adhesion. |
|
Step 2
Remove the Oxidation — Wipe 1
Apply the oxidation removal compound using the first wipe and work in firm, circular motions across the full surface of the lens. You will see yellow or brownish residue transferring onto the cloth within the first few seconds — that is the degraded hardcoat and oxidized polycarbonate lifting away from the surface. Keep working with consistent pressure until the cloth runs clean with no more residue transferring. For heavily yellowed lenses, this step may need a second pass on the worst areas before moving on. Pro tip: Do not stop early because the lens looks better. Work until the cloth is genuinely clean — incomplete removal is the most common reason the final result is patchy. |
|
Step 3
Prepare the Surface — Wipe 2
The second wipe removes compound residue from step two and leaves the polycarbonate surface chemically clean and ready to bond with the UV sealant. This step is short — thirty seconds of full coverage — but it is critical. The UV coat applied in the next step cannot bond properly to a surface that still has compound residue on it. If the sealant cannot bond, it wears off in days rather than months. Pro tip: Cover the entire lens including the corners and outer edges. Any area missed here will produce uneven UV protection and re-oxidize faster than the rest of the lens. |
|
Step 4
Seal with UV Protection — Wipe 3
The third wipe applies the UV-blocking protective coat that replaces the original hardcoat worn away by years of sun exposure. Apply in slow, overlapping strokes covering the full surface. This is the step that determines how long the result holds. With the sealant correctly applied, the polycarbonate is protected against the UV radiation that caused the yellowing in the first place — and the result holds for several months rather than disappearing within weeks. Pro tip: Allow the sealant to cure for three to five minutes before exposing the lens to water or direct sunlight. Avoid touching the surface during this time. |
|
Step 5
Repeat on the Second Headlight
The process takes the same amount of time on the second headlight. With the technique fresh from the first one, most people complete the second headlight slightly faster. Both headlights done and the UV coat curing in under five minutes total. |
|
The step that makes the result last months rather than days is not the first one. It is the UV sealant at the end. That is the step most people either skip or rush — and it is the entire reason the result holds. |
Our step-by-step application guide includes photos for each stage of the process — useful if you want to see exactly what each wipe looks like in use before you start.
 |
How Long Will the Result Last?
With the UV sealant applied correctly as the final step, the restored clarity typically holds for several months under normal driving conditions. The lens looks and performs like new for that period — clear, glossy, and projecting its full light output forward rather than scattering it.
The main variable is UV exposure. A vehicle parked outdoors in direct sun in a warm climate will experience faster re-oxidation than one kept in a garage or in a cooler, cloudier region. Even in high-exposure conditions, however, the sealant significantly extends the result compared to any method that skips UV protection.
When the lens begins to show slight haziness again after several months, you typically do not need to repeat the full three-step process. A single reapplication of wipe three — the UV sealant only — is usually enough to restore clarity and reset the protection. One kit provides enough product for both headlights plus a follow-up maintenance application.
|
“Three months in and they still look exactly the same as the day I did them. The UV coat really is the difference. I’ve tried other products before and they were always back to yellow within a few weeks. Not this time.” — Natalie R. 2010 Hyundai Tucson, previously tried other products |
Tips for Getting the Best Result — Especially on Heavily Yellowed Lenses
The process is straightforward, but these details make a meaningful difference on lenses that are more severely yellowed:
- Work in shade or early morning. Heat causes the compound in wipe one to dry too quickly and reduces how completely it lifts the oxidation. A cool lens in shade gives the compound more contact time.
- Use real pressure on wipe one — not the light touch you would use on a phone screen. The compound needs friction to break up and lift the oxidized layer fully.
- For heavily yellowed lenses, use wipe one twice before moving to wipe two. A second pass on the worst areas lifts whatever the first pass loosened but did not fully remove.
- Do not skip the corners and outer edges on wipe two. The UV coat will not bond to areas that still have compound residue, and those areas will re-oxidize faster than the centre of the lens.
- Give wipe three proper cure time. Three to five minutes is enough — but rushing this by exposing the fresh coat to water or wiping it while wet will compromise the adhesion.
|
Ready to fix your yellow headlights at home? Three wipes. Under five minutes. No experience needed. → Get the Headlight Cleaning and Restoration Wipes |
 |
The Safety Benefit Nobody Talks About
Most people decide to restore their headlights because the yellowing makes the car look older. That is a perfectly valid reason. But the functional improvement is arguably more important — and it is something the before and after photos do not fully capture.
A yellowed, oxidized headlight lens does not just look bad. It physically reduces how much light reaches the road. The rough, porous surface of an oxidized lens scatters light in multiple directions instead of projecting it forward as a beam. The more advanced the yellowing, the more of the bulb’s output is wasted sideways and upwards rather than illuminating the road ahead.
Drivers who restore heavily yellowed headlights frequently describe the experience as feeling like they have fitted brighter bulbs — because the amount of light reaching the road from the same bulb has measurably increased. Night visibility improves, the beam projects further, and driving in low-light conditions feels noticeably more confident.
For that reason alone — independent of how the car looks — restoring yellow headlights is worth doing sooner rather than later.
Our before and after restoration results article covers the visibility improvement in more detail — including what the difference in beam projection actually looks like after restoration.
Related Guides
→ How to Restore Oxidized Headlights at Home — Full Guide
→ Headlight Restoration Before and After — Real Results at Every Stage
→ Do Headlight Restoration Kits Really Work? Honest Answer
→ Why DIY Headlight Restoration Fails — 7 Mistakes to Avoid
→ Does Toothpaste Really Restore Headlights?
Frequently Asked Questions
Can yellow headlights really be restored to clear? |
Yes — in the vast majority of cases. Yellow headlights caused by surface UV oxidation can be fully restored to optical clarity with the correct three-step process. The yellowed surface layer is removed chemically, the polycarbonate is prepared for bonding, and a UV sealant is applied to prevent re-oxidation. The result on most modern vehicles is a lens that looks and functions like new. |
How long does it take to restore yellow headlights at home? |
Under five minutes for both headlights. Each headlight takes roughly ninety seconds to two minutes — wipe one applies and removes the oxidation, wipe two preps the surface, wipe three applies the UV coat. Plus three to five minutes cure time for the sealant before the car can be driven or exposed to water. |
Do I need any special tools or experience to restore yellow headlights? |
No tools and no experience required. The 3-wipe kit is pre-loaded with the correct compound for each stage and labelled in order. There is no mixing, no equipment to set up, and no prior knowledge needed. First-time users regularly complete both headlights on their first attempt in under five minutes. |
Why did my headlights turn yellow again after I tried to fix them before? |
Almost certainly because the previous method did not include UV protection as the final step. When polycarbonate is cleaned without being resealed, it is completely exposed to sunlight and re-oxidizes quickly — often within two to four weeks. The UV sealant in wipe three is what prevents this by replacing the hardcoat that UV radiation degraded over time. |
How do I know when my yellow headlights need restoration vs replacement? |
Restoration works when the yellowing is on the outer surface of the lens — which it almost always is. Run a finger across the lens. If it feels rough or gritty, the surface is oxidized and treatable. If the lens is cracked, has internal fogging from a broken seal, or the plastic has degraded so severely that it crumbles when touched, replacement is necessary. Surface yellowing alone, however heavily it has progressed, responds to restoration. |
Is it safe to restore headlights myself or should I go to a professional? |
It is completely safe to do yourself. The 3-wipe system uses a chemical compound that dissolves the oxidized layer rather than physically abrasive methods that carry risk of scratching. There is nothing in the process that could damage a headlight lens when used correctly. Professional results and DIY results are functionally identical because they use the same three-stage approach. |
The Bottom Line
Yellow headlights are not a cosmetic inconvenience you have to live with — they are a surface problem with a straightforward, affordable fix that anyone can do at home in under five minutes.
The key is doing it completely. Removing the yellowed surface layer is the first step — but leaving the polycarbonate unsealed is what causes every DIY attempt that fades in two weeks. The UV coat at the end of the process is what replaces the hardcoat that years of sunlight removed. That is the step that makes the result hold.
If your headlights are yellow, cloudy, or hazy — whatever stage they are at — the process described in this guide will restore them. The result is visible immediately, and with the UV sealant in place it will last for months.
The headlight cleaning and restoration wipes include all three steps in one kit, covering both headlights with product to spare. Browse the full restoration collection or visit our FAQ page if you have questions before ordering.
|
Yellow headlights are fixable — today, at home, in minutes. No detailer. No sanding. No experience required. → Shop the Headlight Restoration Kit |