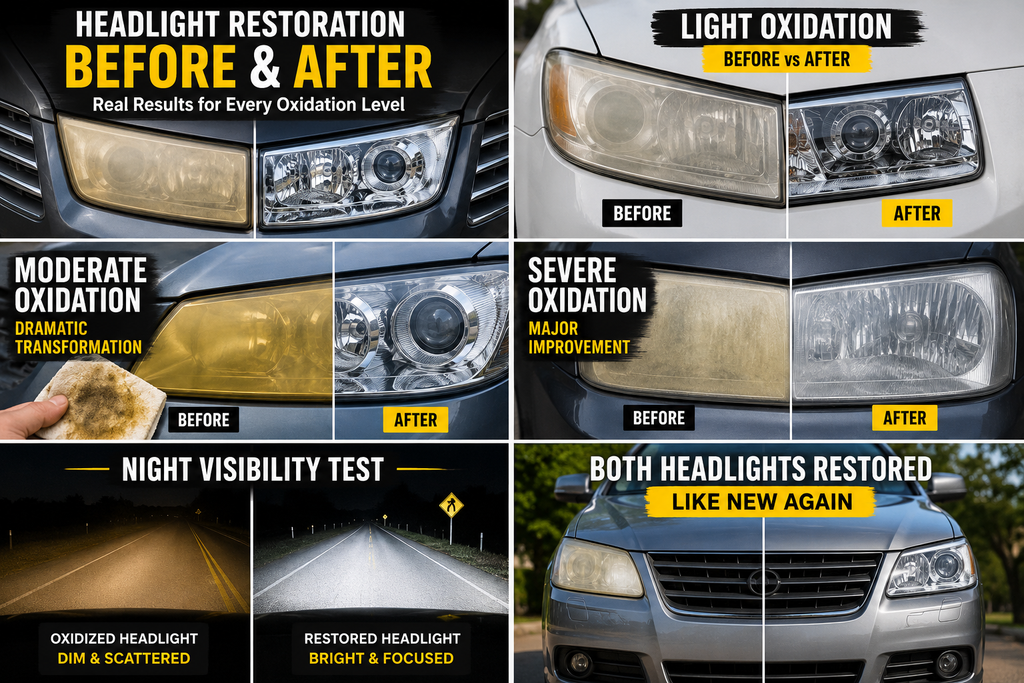
Headlight Restoration Before and After — Real Results at Every Oxidation Level
There's a reason before and after photos are so compelling for headlight restoration. The change is immediate, visible, and dramatic — and no amount of written description captures it the way a side-by-side image does.
But before and after photos can also be misleading if they're not put in context. A lens with very light haze looks different after restoration than one that's been heavily oxidized for years. The result from each is real — but the transformation looks different, and understanding why helps set accurate expectations.
This article does two things: it shows what real restoration results look like across every stage of oxidation, and it explains why the results look the way they do — so you can look at your own headlights and understand exactly what you're likely to see after treatment.

Why Before and After Results Look Different for Every Car
Not all cloudy headlights are at the same stage of deterioration. The polycarbonate lens degrades gradually over years, and the depth of oxidation at the time of treatment directly affects what the result looks like.
There are three broad stages — and the restoration process works at all of them, but produces noticeably different transformations at each level. Understanding which stage your headlights are at before you start is the single most useful thing you can do to set accurate expectations.
The other factor that affects results is whether the restoration was done correctly. A lens at stage one that was improperly treated can look worse than a stage two lens that was restored using the complete three-step process. The technique matters as much as the starting condition.
The most common reason a restoration doesn't look as clean as expected isn't the oxidation level — it's the process. Our guide on the mistakes that cause DIY headlight restoration to fail covers each one in detail.
Stage 1 — Light Oxidation: The Transformation Is Dramatic
Light oxidation is what most drivers notice first — a slight haziness or faint yellow tint that's easy to miss until you see a recently restored or brand-new headlight next to yours. The lens still transmits most of its light, but the clarity is visibly reduced and the colour has shifted from clear to slightly warm or grey.
This is the ideal stage to treat. The oxidized layer is shallow, the polycarbonate underneath is in excellent condition, and the full three-step restoration produces results that are genuinely indistinguishable from a new lens.
Stage 1 — Light Oxidation
Slight haze, faint yellowing, early UV degradation
What it looks like: Mostly transparent with a warm or milky tint. Surface feels slightly rough. Night visibility beginning to reduce. Common in cars 3–6 years old with outdoor parking.
After restoration: Optically clear, glossy, and sharp. Indistinguishable from a new headlight. Full brightness restored.

The before and after at this stage tends to produce the most visually striking transformations because the starting point looks almost acceptable — until you see the result. The difference is the kind that makes you walk around the car a second time.
At stage one, the restoration result is so clean it can actually make the rest of the car look underdressed by comparison. The lens genuinely looks new.
Stage 2 — Moderate Oxidation: The Most Common Case
Moderate oxidation is what the majority of drivers are dealing with when they decide to act. The lens is visibly yellow, noticeably cloudy, and rough to the touch. Night visibility has measurably dropped — not enough to make driving impossible, but enough that you notice the beams don't reach as far as they should.
This stage covers most vehicles between 5 and 10 years old that have been parked outdoors regularly and haven't had any protective treatment applied. It looks worse than stage one, but it's still very much within the range where a full restoration produces an excellent result.
Stage 2 — Moderate Oxidation
Visible yellowing, cloudy surface, rough texture
What it looks like: Clearly yellow and cloudy. Surface feels rough or gritty. Headlight beam is visibly reduced and scattered. Car looks noticeably older than it is.
After restoration: Clear, smooth, and bright. Most of the optical quality restored. A significant visible improvement — the kind most people share photos of.

At stage two, the first wipe in the restoration process will transfer a noticeably larger amount of yellow residue onto the cloth compared to stage one. This is normal — it's the heavier oxidized layer releasing from the surface. The process may need slightly more pressure and time on wipe one to fully lift the deeper oxidation before moving to the prep and sealing steps.
The result is still very strong. Most before and after photos you see for headlight restoration are taken at stage two — because the transformation is visually dramatic while still being achievable in a single treatment.
Want to see a real-world stage two result? Our earlier article documents a side-by-side test where one moderately oxidized headlight was restored while the other was left untreated — the visual difference is exactly what this stage looks like.
Stage 3 — Severe Oxidation: Honest Expectations
Severe oxidation is what happens when a headlight has been left untreated for many years — often on vehicles that have spent a decade or more parked outdoors in sunny climates. The lens is deeply yellowed, heavily frosted, and may have visible pitting or crazing on the surface. The beam is so scattered that it provides limited useful illumination at night.
Restoration at this stage still works — but it requires more from the process, and the result, while a significant improvement, may not reach the optical clarity of a stage one or stage two treatment in a single application.
Stage 3 — Severe Oxidation
Deep yellowing, heavy frost, possible surface pitting
What it looks like: Deeply yellow and opaque. Surface may feel pitted or cratered. Very little useful light projected forward. Often found on cars 10+ years old with no protective treatment history.
After restoration: Significantly clearer — yellow and heavy haze removed. May retain slight milkiness in deeply pitted areas. Still a major functional and cosmetic improvement. A second treatment typically completes the result.

At stage three, wipe one often needs a second pass on the heaviest areas before the oxidation is fully lifted. The surface residue transferred to the cloth will be darker and more substantial than at earlier stages. It's worth taking extra time here — rushing wipe one at stage three is the most common reason a severe oxidation restoration doesn't reach its full potential.
The honest expectation at stage three: a single treatment will produce a major improvement and restore meaningful functionality to the headlight. A second full treatment, or repeated applications of wipe one before sealing, will typically bring the result up to a near-complete restoration in most cases.
Even a severely oxidized headlight responds well to restoration. The result after one treatment may not be perfect — but it will be dramatically better, and functionally it will perform like a completely different headlight at night.
What Restored Headlights Actually Do to Your Night Driving
The cosmetic improvement gets most of the attention in before and after content — and it is genuinely striking. But the functional change is arguably more important and less talked about.
An oxidized headlight lens doesn't just look worse than a clear one. It performs worse in a measurable, physical way. The rough, porous surface of an oxidized lens scatters the light produced by the bulb in multiple directions instead of projecting it forward as a beam. The further the oxidation has progressed, the more light is scattered and the less reaches the road ahead.
Restoring the lens to optical clarity means the full output of the bulb is directed where it is supposed to go. Drivers who restore heavily oxidized headlights commonly report that the car feels like it has significantly brighter or newer bulbs — because the light path has been cleared, not because the bulb itself has changed.
For anyone who drives regularly at night or in low-visibility conditions, this is a safety improvement, not just a cosmetic one.

What the Results Look Like Over Time — Not Just on Day One
Most before and after content shows the immediate result — day one, just after the restoration. That's the most dramatic moment, and it's a fair representation of what the process achieves. But what happens over the following weeks and months is equally important.
A restoration done with the UV sealant applied correctly as the final step holds its clarity for several months. The lens stays smooth, glossy, and optically clear through normal driving conditions. The UV coat is what prevents re-oxidation from starting immediately after the treatment.
A restoration done without the UV coat — or where the sealant was applied over a surface that wasn't properly prepped — looks identical on day one but begins to show haze again within two to four weeks as the unprotected polycarbonate re-oxidizes under sunlight.
This is the same reason toothpaste and home remedy results disappear so quickly — and why the three-step process exists. We covered this in detail in our comparison of toothpaste versus proper restoration.
How to Get the Best Possible Before and After Result
If you want your before and after to look like the best examples in this article, the process has to be done correctly from the first step. Here is what makes the difference:
- Start with a clean, dry lens — surface contamination reduces how effectively wipe one contacts the oxidized layer.
- Use firm circular pressure on wipe one and keep working until the cloth runs clean with no more residue transferring.
- For stage 2 or stage 3 oxidation, do not rush wipe one. Spend additional time on the heaviest areas before moving to the next step.
- Apply the prep wipe thoroughly across the full lens including the edges — this is what makes the UV coat bond correctly.
- Apply the UV sealant in slow overlapping strokes with full coverage. Allow it to cure for several minutes before any water contact.
- Work in shade or early morning. Heat causes the compound to dry too fast and reduces how completely it lifts the oxidation.
Our step-by-step application guide shows each stage of the process with visuals — useful for first-timers who want to see exactly what correct technique looks like before starting.
Ready to see your own before and after?
Three wipes. Under five minutes. Results that hold for months.
What Real First-Time Restorations Look Like
The most useful before and after content is not from professionals demonstrating perfect technique — it's from first-timers who had never done this before and documented their results honestly.
Jessica documented her first restoration from start to finish in our earlier post: First-Time Results — Look How Clear It Looks. She had no prior experience, restored both headlights in under five minutes, and captured the result immediately after wipe three.
For the most dramatic visual comparison, the one-headlight test article shows a single car photographed from the front with one side restored and one side still in its original oxidized condition. That image communicates more than any description.
Related Guides
→ How to Restore Oxidized Headlights at Home — Full Guide
→ Why DIY Headlight Restoration Fails — 7 Mistakes to Avoid
→ Does Toothpaste Really Restore Headlights?
→ The 3-Wipe Method — Professional Process Explained
→ First-Time Results — Jessica's Full Experience
Frequently Asked Questions
|
How dramatic is the before and after difference with headlight restoration? |
|
It depends on the starting condition. Light oxidation produces a result that looks identical to a new headlight. Moderate oxidation — the most common case — produces a transformation that's immediately obvious and very satisfying. Severe oxidation shows a major improvement that may need a second treatment to reach the cleanest possible result. At all stages the before and after is clearly visible. |
|
Do before and after photos for headlight restoration get exaggerated? |
|
Some do — particularly when lighting conditions between the before and after shots are different, or when only light-oxidation cases are shown as representative results. The honest answer is that the transformations you see from proper three-step restoration are real, but they look best when the full process was followed correctly and the lens was at stage one or two oxidation before treatment. |
|
How long does the clear result last after restoration? |
|
With the UV sealant correctly applied as the final step, results typically last several months under normal driving conditions. High UV exposure climates or extended outdoor parking will shorten this interval. When slight dulling begins to return, a single reapplication of the UV coat is usually enough to restore clarity without repeating the full three steps. |
|
Will restoration work on my specific headlights? |
|
The 3-wipe method works on polycarbonate headlight lenses, which covers virtually all vehicles manufactured after the mid-1990s. It does not restore glass lenses found on older classic vehicles, nor does it address internal fogging caused by moisture trapped inside the housing. For surface oxidation on modern polycarbonate lenses, restoration will work. |
|
My headlights look terrible but I've had them a long time. Is it too late to restore them? |
|
Almost certainly not. Even stage three severe oxidation responds well to restoration. The result from a single treatment may not be a perfect ten out of ten, but it will be significantly better than the starting condition and will restore meaningful night driving visibility. Multiple applications are often used for deeply oxidized lenses and the result compounds with each treatment. |
|
What is the best way to photograph my own before and after? |
|
Photograph both headlights in the same lighting conditions — ideally overcast daylight or shade, where glare is minimized and the lens colour and clarity are most accurate. Take the before photo immediately before starting the restoration and the after photo after the UV coat has cured. Avoid photographing in direct sunlight as glare can make both the before and after look better or worse than they actually are. |
The Bottom Line
Before and after headlight restoration results are real — and in most cases they are as dramatic as they look in photos. The key is understanding that the result reflects both the starting condition and the quality of the restoration process.
A headlight at stage one or stage two oxidation treated with the complete three-step process will produce a result that looks optically new and holds that clarity for months. A headlight at stage three will see a significant transformation that improves both appearance and night visibility, with a second treatment bringing it to full potential.
What makes the results last isn't the first step — it's the UV protective coat applied at the end. That's the part most people skip, and it's the difference between a two-week result and a multi-month one.
If you're ready to see your own before and after, the headlight cleaning and restoration wipes include all three steps in one kit. Browse the full restoration collection or visit the FAQ page if you have questions before ordering.
See the difference for yourself.
Real results. Three wipes. Under five minutes.