
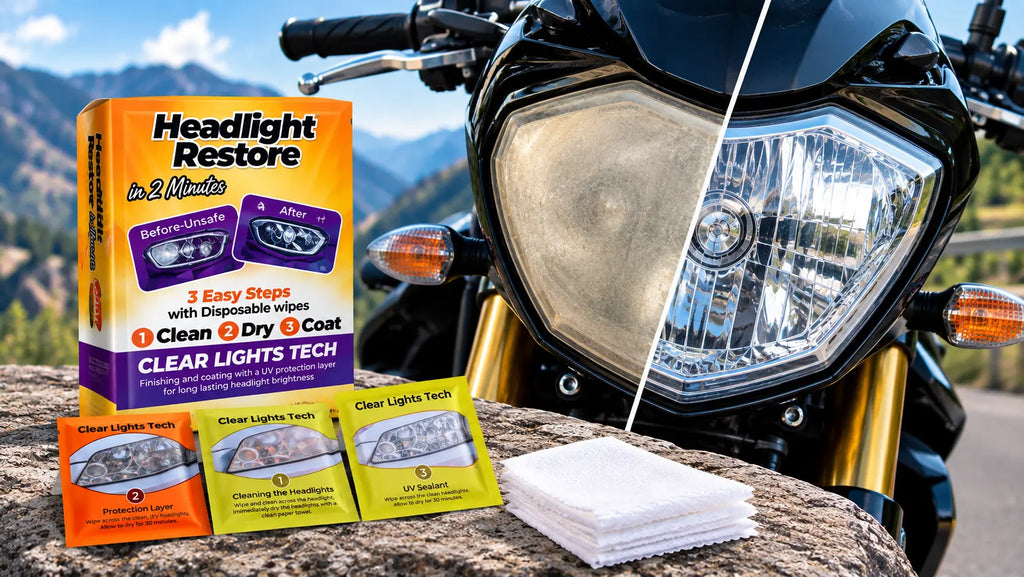
Motorcycle Headlight Restoration: How to Clear a Cloudy Lens
If your bike's headlight has gone yellow, hazy, or cloudy, you're dealing with the same underlying problem car owners face — UV radiation breaking down the protective coating on a polycarbonate lens — but with a few factors working against you that cars generally don't have.
Motorcycles tend to live outside more than cars do. They're often parked uncovered, stored seasonally in ways that don't always involve shade, and ridden in conditions where the headlight is fully exposed to direct sun for long stretches. The result is that bike headlights frequently oxidize faster than the headlights on a car of the same age.
The upside: you've got one lens instead of two, and it's usually smaller. Restoring a motorcycle headlight is typically a faster job than doing a car, often under two minutes start to finish.
Motorcycle vs. Car Headlights — What's Actually Different
The chemistry is identical, but the practical context differs in ways worth knowing before you start:
Factor |
Car Headlights |
Motorcycle Headlights |
Typical sun exposure |
Some garage storage common |
Often parked outdoors, fully exposed |
Lens size |
Large, mostly flat or gently curved |
Smaller, often more sharply curved |
Number of lenses |
Two (both need doing) |
Usually one (faster job) |
Typical restoration time |
About 2 minutes per headlight |
Under 2 minutes total |
Impact of oxidation |
Reduced beam across two lights |
All output from a single light affected |
The oxidation process is the same. What's different is how quickly it gets there — and that a motorcycle has no second headlight compensating for the one that's gone hazy. |

Why Bike Headlights Oxidize Faster
A few factors compound to accelerate oxidation on motorcycle headlights compared to cars.
More consistent direct sun exposure
Motorcycles are less likely to spend their time in a garage, carport, or covered parking structure. A bike parked outside at work, at home, or at a meet is taking direct UV exposure on a lens that sits fully exposed at the front of the vehicle, often angled upward toward the sky more than a typical car headlight.
Less protection from surrounding bodywork
On a car, the headlight is often somewhat recessed into the front bodywork, which can provide marginal shading depending on the angle of the sun. Many motorcycle headlights are more prominently exposed with little surrounding structure to shade them at any time of day.
Seasonal storage that isn't always shaded
Bikes that get stored for a season aren't necessarily stored in the dark. A bike under a tarp in a yard, or parked in a shed with windows, can still take meaningful UV exposure during months it isn't even being ridden.
The same storage problem hits larger vehicles even harder — our guide to RV and camper headlight restoration covers what months of uncovered parking does to a lens and how to seal it before storage.
Because sun exposure is the primary driver here, prevention matters even more for bikes — see How to Protect Headlights from UV Damage for approaches that apply equally to motorcycles.
Why a Cloudy Headlight Matters More on a Bike
There's a practical safety angle here that's more pronounced on a motorcycle than a car. A car with one oxidized headlight still has a second one producing a full beam. A motorcycle with a hazy headlight has lost a meaningful portion of its total forward lighting, with nothing compensating.
Beyond your own visibility, a motorcycle headlight also serves an important role in making you visible to other drivers — which is why many riders run their headlight during daylight hours. An oxidized lens scatters and diffuses that light, which can reduce how clearly and how far away you register to drivers at intersections and in mirrors. It's a small thing that contributes to a safety factor riders generally take seriously.
For a full explanation of how oxidation actually reduces usable light output, see How to Improve Night Driving Visibility — the mechanism is the same on a bike.
How to Restore a Motorcycle Headlight
The process is the same three-step method used on car headlights, with a few adjustments for the smaller, often more curved lens you're working with.
|
STEP 1 Clean the Lens First Wash the lens with clean water and let it dry fully. Motorcycle headlights tend to collect more bug residue and road grime than car headlights simply because of their exposed position at the very front of the bike, so this step often matters more here than it does on a car. Bike-specific tip: Bug residue that's been baked on by heat can be stubborn — soak it with water and let it soften rather than scrubbing aggressively, which risks scratching an already-compromised lens surface. |
|
STEP 2 Remove the Oxidation Work the oxidation-removal compound across the full lens with firm, even circular pressure. You'll see the yellow-brown residue transferring onto the cloth as the degraded layer lifts. Keep going until the cloth comes away clean across the whole surface. Bike-specific tip: On a sharply curved bike lens, work in smaller sections and pay extra attention to the outer edges where the curve is tightest — these are the easiest spots to under-treat and the most likely to look inconsistent afterward. |
|
STEP 3 Prep and Seal with UV Protection Wipe the surface clean of compound residue, then apply the UV-protective sealant across the entire lens in even, overlapping strokes. Allow it to cure before riding or exposing the bike to rain. Bike-specific tip: Given how much more sun exposure a typical bike gets, this step is arguably even more important on a motorcycle than a car — it's the only thing standing between the freshly cleaned lens and the UV that caused the problem in the first place. |
For the complete technical breakdown of each step, see How to Restore Oxidized Headlights at Home — the process is the same, just applied to a smaller lens.
|

A Few Bike-Specific Things to Watch For
Motorcycles have some details cars don't that are worth keeping in mind:
Take care around these when working on a bike headlight:
• Chrome bezels and trim rings around the headlight — avoid getting compound on polished chrome and wipe off immediately if you do
• Painted tank and fairing surfaces close to the headlight, which are often much closer than equivalent bodywork on a car
• Rubber gaskets and seals around the lens edge, which can sit closer to the working surface on a compact bike headlight
• Any aftermarket lens covers, tinted shields, or protective films, which shouldn't be treated with a restoration compound
A common-sense approach works fine here: keep the compound on the lens itself, wipe up any overspill promptly, and if you're working on a bike with a lot of chrome or exposed paintwork close to the headlight, a strip of masking tape around the lens edge takes thirty seconds and removes the worry entirely.
Does It Work on Glass Motorcycle Headlights?
Worth flagging: some older and vintage motorcycles use glass headlight lenses rather than polycarbonate. Glass doesn't oxidize the way polycarbonate does — it can get dirty, etched, or pitted from road debris, but it doesn't develop the yellowing, hazy surface layer that restoration compounds are designed to remove.
If your bike has a glass lens, a restoration wipe kit isn't the right product — glass cleaning and polishing products are what you'd want instead. Most modern motorcycles use polycarbonate, but if you're working on an older or vintage bike, it's worth confirming before you start.
How to tell which one you have: tap the lens gently with a fingernail or a coin — glass gives a sharp, high-pitched click, while polycarbonate sounds duller and more plastic. Glass also feels noticeably colder to the touch than the surrounding bodywork on a cool morning, and it won't show the fine surface scratches that plastic lenses pick up over time. Many polycarbonate lenses are also molded with a small "PC" marking somewhere along the edge. And the simplest test of all: if the lens is yellowed or hazy on the outer surface, it's almost certainly polycarbonate — glass just doesn't do that.
If you're unsure whether what you're seeing is genuine oxidation, see 7 Signs Your Headlights Need Restoration for the diagnostic checks.
How Often Will You Need to Redo It?
Because motorcycles typically see more direct sun exposure than cars, expect to be on the shorter end of the usual interval. Where a garage-kept car might hold clarity for several months, a bike parked outdoors year-round may need the three-step process repeated more frequently.
The good news is that a repeat is quick — on a single bike lens caught at the first sign of dulling, wipe one has very little to remove and the whole job is still under two minutes. Each repeat is the full three-step process; there's no sealant-only shortcut, because the UV coat needs a freshly cleaned and prepared surface to bond to. Doing it proactively is considerably easier than waiting for the oxidation to fully return.
For the complete picture on maintenance intervals and what affects them, see How Long Does Headlight Restoration Last?.

Related Guides
-> How to Restore Oxidized Headlights at Home
-> RV and Camper Headlight Restoration
-> How to Protect Headlights from UV Damage
-> How to Improve Night Driving Visibility
-> How Long Does Headlight Restoration Last?
-> DIY Headlight Restoration: The Complete Guide
Frequently Asked Questions
Can I use a car headlight restoration kit on a motorcycle? |
Yes, provided your bike has a polycarbonate lens, which most modern motorcycles do. The chemistry and process are identical — the only differences are practical ones, like working around a smaller, more sharply curved lens and being mindful of nearby chrome, paint, and seals. |
Why do motorcycle headlights seem to go cloudy faster than car headlights? |
Mainly because of sun exposure. Motorcycles are less likely to be garage-kept, often park fully exposed, and the headlight typically sits more prominently at the front with less surrounding bodywork providing any shade. More cumulative UV exposure means faster oxidation. |
How long does it take to restore a motorcycle headlight? |
Usually under two minutes, since you're working on a single smaller lens rather than a pair of larger ones. Heavily oxidized lenses may need a second pass on the removal step, which adds a few minutes. |
Will restoration work on a vintage motorcycle with a glass headlight? |
No — glass lenses don't oxidize the way polycarbonate does, so a restoration compound designed to remove oxidized plastic isn't the right product. Glass lenses that look cloudy are usually dirty, etched, or pitted, which calls for glass cleaning or polishing products instead. Most modern bikes use polycarbonate, but it's worth confirming on older machines. |
Do I need to remove the headlight from the bike to restore it? |
No. The process is done with the headlight in place, the same as on a car. Just take reasonable care to keep the compound off nearby chrome, paint, and rubber seals, and wipe up any overspill promptly. Masking tape around the lens edge is a quick way to remove the worry entirely. |
How often should I reapply UV protection on a motorcycle headlight? |
Likely more often than on a garage-kept car, given the higher sun exposure most bikes get. Each repeat is the full three-step process — there is no sealant-only shortcut, because the UV coat needs a freshly cleaned and prepared surface to bond to. On a single bike lens caught early, that's still under two minutes, and doing it at the first sign of dulling is much easier than waiting for full oxidation to return. |
The Bottom Line
Motorcycle headlights oxidize for exactly the same reason car headlights do — UV radiation degrading the protective coating on a polycarbonate lens — but bikes tend to get there faster thanks to more consistent, less shaded sun exposure. With only a single lens to treat, though, restoring a motorcycle headlight is typically a quicker job than doing a car, often done in under two minutes.
Given that a bike has no second headlight compensating for a hazy one, and that headlight visibility plays a real role in how clearly other drivers register you, it's a worthwhile bit of maintenance that takes very little time.
The headlight restoration kit works the same on a bike lens as a car lens — one smaller lens just means you're done faster.
|
Clear lens before your next ride. One headlight, under two minutes, no tools. |